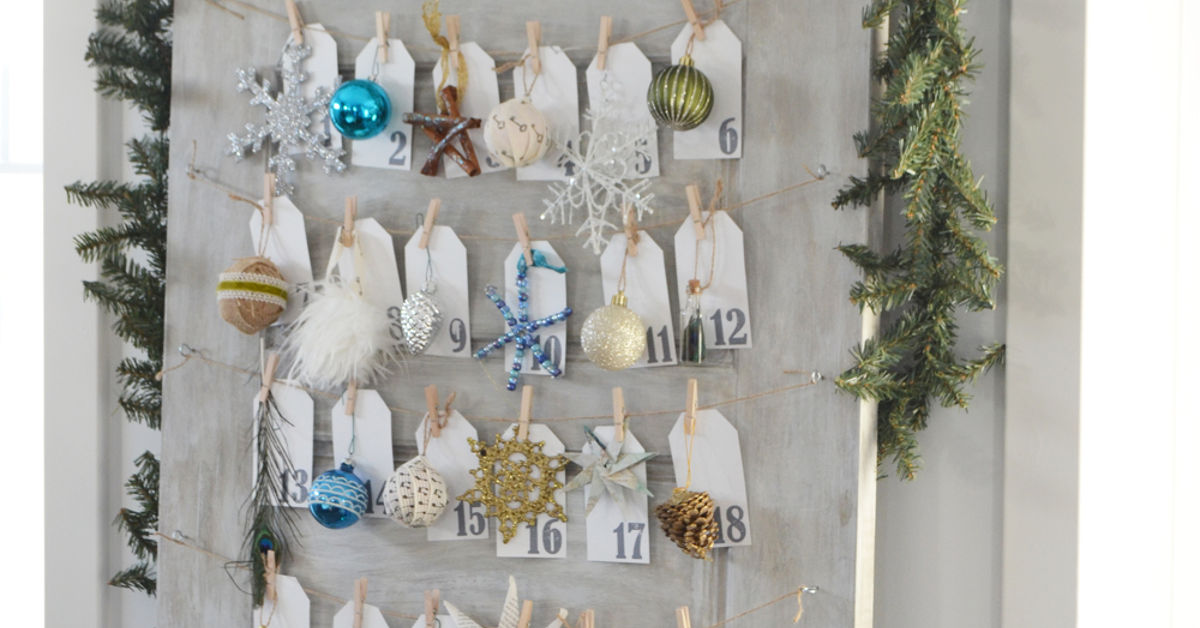
Some holiday decorations arrive in neat little boxes. Others arrive leaning against the garage wall, wearing three coats of mystery paint and asking for one last chance at glory. If you have an old door tucked away after a renovation, rescued from a flea market, or discovered in the “I’ll use this someday” corner of the shed, good news: someday has arrived. Turning an old door into a daily ornament Advent calendar is one of those DIY Christmas projects that feels charming, useful, sentimental, and slightly ridiculous in the best possible way.
Instead of buying another disposable countdown calendar filled with tiny chocolates that vanish faster than your holiday budget, this project creates a reusable Advent calendar that becomes part of your family’s seasonal tradition. Each day in December, one ornament is added to the door until it becomes a full display of memories, color, sparkle, and cheerful clutter. It is part Christmas countdown calendar, part upcycled holiday decor, and part vertical memory board. In other words, it is exactly the kind of project that makes guests say, “Wait, is that an actual door?” Yes. Yes, it is.
This guide explains how to transform an old wooden door into a daily ornament Advent calendar, including how to choose the right door, prep it safely, design the layout, number each day, hang ornaments securely, and personalize the project so it looks intentional rather than like a door got lost on its way to the hallway.
Why an Old Door Makes the Perfect Advent Calendar
An old door has something many store-bought Advent calendars lack: character. Scratches, panels, old hardware, chipped corners, and weathered paint all add visual texture. A flat board can work, of course, but a vintage door already has architectural interest. The panels create natural sections, the height gives the project drama, and the sturdy wood can hold hooks, knobs, ribbon, garland, and lightweight ornaments with ease.
Repurposing old doors is also a smart upcycling idea. Instead of sending usable wood to the landfill, you give it a decorative second life. Designers and DIYers have long used salvaged doors as headboards, hall trees, garden features, shelving backdrops, and statement art. An Advent calendar simply adds a holiday twist: the door becomes a countdown display that changes daily.
There is also a practical benefit. A door-sized Advent calendar uses vertical space, which is perfect for small homes, apartments, entryways, dining rooms, mudrooms, and cozy corners where a full extra tree may feel like decorating with a small forest. Lean it against a wall, mount it securely, or place it on a covered porch if the materials are weather-safe.
What Is a Daily Ornament Advent Calendar?
A traditional Advent calendar counts down the days before Christmas, often with 24 numbered doors or windows beginning on December 1 and ending on Christmas Eve. A daily ornament Advent calendar keeps the countdown idea but changes the reward. Instead of opening a paper door or drawer, you add one ornament per day to the display.
The concept is simple: attach 24 hooks, pegs, small knobs, clips, or ribbon loops to an old door. Number each spot from 1 to 24. Store ornaments nearby in a basket, bag, or drawer. Every day, a family member hangs the ornament for that date. By Christmas Eve, the door is fully decorated and becomes a festive focal point.
You can use miniature ornaments, handmade felt ornaments, paper tags, wood cutouts, photo ornaments, small bells, dried orange slices, tiny wreaths, or family keepsakes. The best part is that this project can grow over time. One year you might use simple store-bought ornaments. The next year, you can add handmade pieces, vacation souvenirs, children’s crafts, or ornaments that represent family milestones.
Materials and Tools You Will Need
You do not need a professional workshop to make this DIY ornament Advent calendar. Most supplies are easy to find at hardware stores, craft stores, thrift shops, and maybe your own junk drawer, which is basically a tiny hardware store with worse lighting.
Basic Materials
- One old wooden door, cabinet door, shutter, or large salvaged panel
- 24 small hooks, cup hooks, knobs, drawer pulls, clothespins, or pegs
- 24 lightweight ornaments
- Number tags, vinyl numbers, stencils, wooden numbers, or paint markers
- Primer and paint, chalk paint, stain, or clear sealant
- Sandpaper in medium and fine grits
- Wood filler for dents or unwanted holes
- Painter’s tape and measuring tape
- Pencil, ruler, and level
- Ribbon, garland, greenery, bows, or battery-powered fairy lights
Helpful Tools
- Screwdriver or drill
- Small drill bit for pilot holes
- Stud finder if mounting the door on a wall
- Paintbrush or small roller
- Drop cloth
- Safety glasses and dust mask or respirator
Choose hardware based on the weight of your ornaments. Tiny felt ornaments can hang from mini cup hooks or ribbon. Heavier glass ornaments need stronger hooks and better spacing. If children or pets will be involved, use shatterproof ornaments. Christmas magic is delightful; stepping on broken glass at 6 a.m. is not.
Step 1: Choose the Right Old Door
The best door for this project is sturdy, mostly flat, and not too heavy for your display location. A paneled wood door is especially attractive because the panels help organize the design. A narrow closet door works well in small spaces. A cabinet door can become a tabletop version. A louvered door creates built-in slots for ribbon, though it may require extra cleaning because louvers collect dust like it is their chosen profession.
Before you fall in love with a salvaged door, inspect it carefully. Look for loose joints, deep cracks, rot, mold, sharp splinters, and unstable glass. If the door has glass panes, either make sure they are secure or remove them and replace the openings with chicken wire, fabric, plywood, corkboard, or decorative backing. For a household with kids, dogs, cats, or enthusiastic adults carrying cocoa, safety should win over aesthetics every time.
If the door is extremely heavy, consider cutting it down, using only the upper section, or choosing a cabinet door instead. A full-size solid wood door can make a stunning Advent calendar, but it needs thoughtful mounting. When in doubt, lean toward manageable rather than monumental. You are making holiday decor, not installing a medieval castle gate.
Step 2: Clean and Prep the Surface
Start by removing loose dirt, cobwebs, old tape, nails, staples, and mystery smudges. Wipe the door with a damp cloth and mild cleaner, then let it dry completely. If the surface has peeling paint, rough edges, or splinters, lightly sand it smooth. Fill unwanted holes with wood filler, let it dry, and sand again.
If the door may have been painted before 1978, be careful. Older painted doors can contain lead-based paint. Do not aggressively sand, scrape, or heat old paint unless you know it is lead-free. Lead dust is dangerous, especially for children and pregnant people. Use a lead test kit or consult a lead-safe professional if you are unsure. For a decorative project, it is often better to seal an old painted surface with a clear protective topcoat rather than disturb layers of vintage paint.
Once the door is clean and safe to work with, decide whether you want to preserve its aged look or give it a fresh finish. A rustic whitewash creates a farmhouse Christmas style. Deep green feels classic. Matte black makes brass hooks and colorful ornaments pop. Red is bold and cheerful. Natural wood with a clear sealant gives the project a warm, heirloom feel.
Step 3: Paint, Stain, or Seal the Door
If you want a smooth painted finish, apply primer first, especially if the door has dark stain, glossy paint, or uneven color. Then apply two thin coats of paint, allowing proper drying time between coats. Thin coats look better than one thick coat, which tends to announce, “I was in a hurry and emotionally dependent on this roller.”
Chalk paint is popular for vintage-style holiday crafts because it creates a soft matte surface and usually sticks well to wood. Milk paint can create a more authentically aged look. Standard interior latex paint is durable and easy to clean. If the door will be displayed outdoors on a covered porch, use exterior-rated paint and sealant.
For a distressed finish, paint the door, let it dry, then lightly sand corners and raised edges where natural wear would happen. Focus on believable areas: around panels, near the old knob, along the bottom edge. Random sanding in the middle of a flat panel can look less “vintage charm” and more “raccoon with a manicure.”
Step 4: Plan the Advent Calendar Layout
Before installing hooks, plan the layout. The most common design uses 24 numbered spots, but you can add a 25th hook for Christmas Day if that fits your family tradition. Lay the door flat on a table or sawhorses if possible. Arrange paper tags or sticky notes where the hooks will go. Step back and check the balance.
Here are a few layout ideas:
- Grid style: Four columns of six hooks create a clean, organized look.
- Panel style: Place numbers inside the door’s existing panels for a custom built-in effect.
- Tree shape: Arrange hooks in a triangle, starting with one at the top and widening toward the bottom.
- Garland path: Run ribbon or greenery diagonally and attach ornaments along the curve.
- Random vintage style: Scatter hooks in a playful pattern, but keep spacing wide enough for ornaments.
Leave enough room between hooks so ornaments do not overlap too much. Lightweight flat ornaments can be closer together. Round ornaments, bells, stuffed felt shapes, and mini wreaths need more breathing room. If your door has panels, use them as natural zones: perhaps six ornaments per panel on a four-panel door.
Step 5: Add Numbers With Style
The numbers are what turn a pretty ornament display into a true Advent calendar. You can stencil numbers directly onto the door, paint them by hand, apply vinyl decals, attach small wooden number cutouts, or hang numbered tags from each hook.
For a farmhouse look, use kraft paper tags and black marker. For a polished style, try gold vinyl numbers. For a whimsical family version, let children decorate the number tags. For a vintage look, use mismatched metal house numbers, old drawer labels, or stamped paper circles.
Make sure the numbers are easy to read. A beautiful calendar that requires guests to squint like they are decoding a holiday treasure map is less fun in daily use. High contrast helps: white numbers on dark paint, black numbers on pale paint, or metallic numbers on matte finishes.
Step 6: Install Hooks, Knobs, or Clips
Once the layout is set, mark each hook location with a pencil. Use a ruler and level if you want precise rows. Drill small pilot holes before screwing in hooks; this helps prevent wood from splitting. For knobs or drawer pulls, follow the hardware instructions and use screws that fit the thickness of the door.
Cup hooks are affordable and easy to install. Small brass hooks feel classic. Black hooks look modern. Wooden pegs give a Scandinavian feel. Mini clothespins clipped to twine are excellent for paper ornaments, activity cards, and lightweight felt shapes. You can also mix hardware styles if you want the door to look collected and charming.
Test a few ornaments before installing all 24 hooks. Check whether they hang at the right angle, whether they bump into each other, and whether the hook depth is enough. This is the moment to adjust spacing, not after you have installed everything and developed a personal relationship with your drill.
Step 7: Choose the Ornaments
The ornaments are the heart of the project. You can keep the set coordinated or make it wonderfully personal. A daily ornament Advent calendar works especially well when each ornament has meaning. One might represent a family trip. Another might be a child’s first handmade star. Another might be a tiny wooden house because someone in the family is obsessed with cozy cottages and refuses to apologize.
Good ornament options include:
- Mini shatterproof ball ornaments
- Handmade felt ornaments
- Wood slice ornaments
- Paper snowflakes or folded paper stars
- Photo ornaments
- Small bells
- Dried orange slices tied with twine
- Mini wreaths
- Salt dough ornaments
- Small keepsake tags with written memories
For families with young children, consider using soft ornaments for the lower hooks and more delicate pieces higher up. If the door leans against a wall, avoid heavy ornaments near the top that could shift the balance.
Step 8: Add a Storage System for the Daily Countdown
The ornaments need a home before they are added to the door. A small basket beside the display is the easiest option. You can also use 24 numbered envelopes, fabric bags, small boxes, or a drawer organizer. If you want a surprise element, hide each ornament in a numbered pouch so no one knows what is coming next.
Another fun idea is to pair each ornament with a daily activity card. Day 1 might say, “Make hot cocoa.” Day 7 might say, “Drive around to see Christmas lights.” Day 14 might say, “Donate a toy.” Day 22 might say, “Watch a holiday movie in pajamas.” Keep the activities realistic. December is busy enough without a calendar that casually demands homemade gingerbread architecture on a Tuesday night.
Step 9: Decorate the Door Without Overcrowding It
Once the hooks and numbers are in place, add finishing touches. A simple wreath near the top, ribbon tied around the old doorknob, a strand of battery-powered fairy lights, or a swag of faux greenery can make the door feel festive before the ornaments are added.
Try not to overdecorate the base door. Remember, it will become fuller every day. If the background is already loaded with bows, lights, signs, bells, garland, and a tiny Santa doing jazz hands, the ornaments may get lost. Start simple and let the calendar build visually as Christmas approaches.
If the door has an old knob, keep it. A vintage knob adds charm and gives you another place to tie ribbon, greenery, or a small tag that says “Countdown to Christmas.” If the knob is missing, you can install a decorative replacement or leave the hole as part of the salvaged look.
Step 10: Display It Safely
A full-size door can be heavy, so display it responsibly. If leaning it against a wall, use anti-tip hardware, especially in homes with children or pets. If hanging it, mount it into wall studs whenever possible and use hardware rated for the weight of the door plus decorations. Heavy wall pieces should not rely on adhesive hooks.
For a lighter cabinet-door version, a sawtooth hanger or D-rings may be enough, depending on weight. For a full door, consider using a French cleat, heavy-duty D-rings, or secure brackets. If you are not confident about mounting it, ask someone with experience. Holiday cheer is wonderful, but a door falling off the wall is a plot twist nobody requested.
Creative Variations for Different Home Styles
Farmhouse Christmas Door
Paint the door warm white, distress the edges, use black metal hooks, kraft paper number tags, plaid ribbon, and wood ornaments. Add eucalyptus or pine garland for texture.
Vintage Cottage Advent Calendar
Keep the original chipped paint if safe, seal it with clear finish, and use mismatched knobs as ornament hangers. Add lace ribbon, mercury-glass-style ornaments, and handwritten tags.
Modern Minimalist Door
Paint the door matte black, forest green, or soft greige. Use simple brass hooks and white ceramic number tags. Choose ornaments in a limited palette for a calm, elegant look.
Kid-Friendly Countdown Door
Use bright paint, large numbers, shatterproof ornaments, felt shapes, pom-poms, and daily activity cards. Let children help choose the ornament for each day.
Memory Lane Ornament Calendar
Turn each day into a family story. Use photo ornaments, school crafts, vacation souvenirs, tiny frames, and tags with short handwritten memories. By Christmas Eve, the door becomes a vertical scrapbook.
Common Mistakes to Avoid
The first mistake is choosing a door that is too damaged or too heavy. A little wear is charming; structural instability is not. The second mistake is spacing hooks too close together. Ornaments need room, especially once the calendar fills up. The third mistake is skipping safety prep on old paint. Always consider the age and condition of the door before sanding or scraping.
Another common issue is using ornaments that are too heavy for small hooks. Test before committing. Also avoid placing the calendar where it blocks walkways, vents, doors, or curious pets with a known history of holiday crimes. Finally, do not make every daily activity too ambitious. A good Advent calendar should bring joy, not assign seasonal homework.
Budget-Friendly Tips
This project can be surprisingly affordable. Look for doors at salvage yards, thrift stores, online marketplaces, garage sales, or renovation leftovers. Cabinet doors are often cheaper and easier to manage than full doors. Use leftover paint from another project. Mix thrifted ornaments with handmade ones. Make number tags from cardstock, brown paper bags, or scrap wood.
If you already own a box of mismatched ornaments, this is the perfect way to use them. The “not quite matching” quality can actually make the calendar more interesting. A polished store-bought set looks nice, but a mix of handmade stars, tiny sleds, old bells, and slightly odd snowmen tells a better story. Holiday decor is allowed to have personality. In fact, it should.
How to Store the Calendar After Christmas
When the season ends, remove the ornaments and wrap fragile pieces individually. Store them in a labeled box or divided ornament organizer. Keep the hooks on the door so it is ready for next year. If you have space, cover the door with a cloth and store it upright in a closet, basement, attic, or garage. Avoid damp areas that could warp the wood or damage paint.
For smaller cabinet-door calendars, storage is much easier. Wrap the piece in an old sheet or bubble wrap and tuck it with the rest of your holiday decorations. Keep the daily activity cards in an envelope so you can reuse or update them next year.
Why This Project Becomes a Tradition
The beauty of turning an old door into a daily ornament Advent calendar is not just the finished display. It is the repeated ritual. Every day adds something small. Every ornament creates a pause. In a season that can easily become a blur of shopping lists, shipping deadlines, school events, and cookie-related negotiations, the calendar gives your household one tiny moment to gather.
Some days, the moment may be peaceful. Other days, someone may argue over who gets to hang the glitter reindeer. That is fine. Traditions do not need to be perfect to be meaningful. They simply need to be repeated with enough affection that everyone remembers them later.
Personal Experiences and Practical Lessons From Making an Old Door Ornament Advent Calendar
The first time you make an old door Advent calendar, you may imagine a smooth afternoon of painting, measuring, and casually sipping coffee while holiday music plays in the background. In reality, the door may be heavier than expected, the hooks may roll off the table, and someone will almost certainly ask why there is a door in the dining room. This is part of the charm. DIY projects have a way of keeping us humble, especially when power tools and Christmas ribbon appear in the same room.
One of the biggest lessons is to let the door guide the design. A paneled door does not need a complicated layout. The panels already provide structure. On a four-panel door, placing six hooks in each panel creates a balanced look without much math. On a narrow door, a single vertical line of hooks with ribbon swags can look elegant. On a door with lots of character, such as old hardware or worn paint, simple ornaments often work better than flashy ones.
Another helpful experience is to test the display before December begins. Hang all 24 ornaments at once, even if you plan to add them gradually later. This shows whether the spacing works and whether any ornaments are too large, too heavy, or visually lost. It is much easier to move a hook in November than to discover on December 18 that the snowman ornament is blocking days 19 through 22 like a festive traffic jam.
Families often enjoy the calendar more when each ornament has a story. A tiny airplane can represent a trip. A felt cookie can honor a baking day. A little house can mark a first home. A photo ornament can celebrate a child, grandparent, pet, or memorable year. These small details turn the project from decoration into a living family archive. The door becomes more meaningful each season because new ornaments can be added and old favorites return.
It also helps to involve children without giving them complete creative control unless you are emotionally prepared for 24 ornaments clustered at knee height. Let kids paint number tags, choose ribbon, decorate felt shapes, or pick the ornament of the day. If you prefer a cohesive look, offer a limited selection of colors and materials. Children still get ownership, and the finished calendar does not look like a glitter tornado made several executive decisions.
From a practical standpoint, shatterproof ornaments are worth considering, even in adult households. Doors move. Hooks wiggle. Pets leap. Guests brush past displays while carrying snacks. Felt, wood, paper, and plastic ornaments make the calendar less stressful. Save precious glass heirlooms for higher hooks or for a separate tree where they can be admired from a safe distance.
The best part of the finished calendar is how it changes the mood of a room. On December 1, it looks simple and expectant. By the second week, it feels cheerful. By Christmas Eve, it becomes full, layered, and personal. Unlike decorations that appear all at once, this one builds slowly. That daily rhythm is what makes the project special. It gives the season a little suspense, a little beauty, and a very good reason to keep an old door out of the landfill.
Conclusion
Turning an old door into a daily ornament Advent calendar is a creative, sustainable, and deeply personal way to count down to Christmas. With a sturdy salvaged door, 24 hooks, numbered tags, and a collection of meaningful ornaments, you can create a holiday display that doubles as decor and tradition. The project is flexible enough for farmhouse, vintage, modern, kid-friendly, or memory-filled styles, and it can be reused year after year.
The key is thoughtful preparation: choose a safe door, clean it well, respect the possibility of old lead paint, plan the layout, use secure hardware, and select ornaments that suit your household. The result is more than a DIY Advent calendar. It is a daily reminder to slow down, add a little joy, and let the season unfold one ornament at a time.
Note: This article is based on real DIY, home improvement, holiday craft, upcycling, and lead-safe renovation guidance from reputable U.S. home, safety, and lifestyle sources. It is written as original, publication-ready content and does not include copied source text or unnecessary citation placeholders.