Note: This article is written for web publishing and contains no external source links inside the HTML body.
Growing a square watermelon sounds like something invented by a gardener who looked at a perfectly round fruit and said, “Lovely, but what if it looked like office furniture?” The good news is that square watermelons are real. The even better news is that you do not need magical seeds, a secret Japanese greenhouse, or a degree in melon geometry. You need a healthy watermelon vine, warm weather, patience, and a sturdy cube-shaped mold.
The important truth is simple: a square watermelon is not a special variety. It is a regular watermelon trained to grow inside a box while the fruit is still young and flexible. As the melon expands, it presses against the walls of the mold and takes on a cube-like shape. That is the whole trick. Of course, like many “simple” garden projects, the details matter. Put the fruit in too early and you may damage it. Put it in too late and it will shrug at your mold like a teenager asked to clean their room.
This step-by-step guide explains how to grow a square watermelon at home, from choosing the right variety to building a mold, supporting pollination, managing water, and knowing when to harvest. Whether you want a conversation piece, a science project, a garden challenge, or the most aggressively organized fruit in the neighborhood, here is how to do it.
What Is a Square Watermelon?
A square watermelon, also called a cube watermelon, is a watermelon grown inside a rigid square container. The mold controls the fruit’s outward shape while the vine continues to feed it. The idea became famous in Japan, where novelty fruit is often grown as a premium gift item. Many commercial square watermelons are harvested before full ripeness because keeping a crisp cube shape can matter more than flavor. For home gardeners, the goal can be different: grow something fun, unusual, and possibly edible if you give the fruit enough room and time to ripen.
The key is balance. A tight mold creates sharper corners but may prevent full ripening. A slightly larger mold gives the watermelon breathing room, making it more likely to taste good, though the edges may be less perfect. In other words, you may have to choose between “museum-worthy cube” and “snack-worthy melon.” Both are noble paths.
Before You Start: What Square Watermelons Need
Watermelons are warm-season crops. They grow best in full sun, fertile soil, steady moisture, and warm temperatures. Most varieties need roughly 70 to 100 days from planting to harvest, depending on climate and cultivar. A square watermelon also needs one extra tool: a durable mold that can handle pressure as the fruit expands.
For best results, choose a small or medium watermelon variety rather than a giant one. Compact “icebox” types are easier to manage in a home garden because the fruit size is predictable, the vines are often more manageable, and the mold does not need to be the size of a microwave. Good options include small seeded varieties or compact hybrids with fruits in the 6- to 12-pound range. Seedless watermelons can work, but they require a seeded pollinator nearby, so beginners usually have an easier time with seeded varieties.
How to Grow a Square Watermelon: 13 Steps
1. Choose the Right Watermelon Variety
Start with a small watermelon variety. Large picnic types can outgrow a home mold quickly, turning your neat garden experiment into a wrestling match with a green bowling ball. Look for compact, early-maturing, or “icebox” watermelons. Varieties such as Sugar Baby, Mini Love, or other small-fruited types are practical choices because they mature faster and do not require acres of vine space.
Read the seed packet carefully. Pay attention to average fruit size, days to maturity, vine length, and disease resistance. If the packet says the fruit commonly reaches 25 pounds, that is your cue to step away unless your cube mold was built by a furniture factory.
2. Pick a Sunny, Warm Growing Site
Watermelons love sun. Choose a location that receives at least 8 hours of direct sunlight per day. More sun usually means stronger vines, better flowering, and sweeter fruit. Avoid shaded corners, soggy spots, and areas where cucumbers, squash, pumpkins, or melons struggled with disease the previous year.
Good air circulation is also helpful. Dense, damp foliage can encourage fungal problems, especially in humid climates. A sunny, open bed gives your watermelon vines room to breathe and reduces the odds of your square melon project turning into a mildew documentary.
3. Prepare Fertile, Well-Drained Soil
Watermelons grow best in loose, fertile, well-drained soil. Sandy loam is ideal because it warms quickly in spring and allows roots to spread easily. If your soil is heavy clay, improve it with compost and consider planting on raised mounds or raised beds. Raised planting areas warm faster, drain better, and give the roots a more comfortable home.
Before planting, mix in finished compost or well-rotted organic matter. A soil test is the best way to know exactly what nutrients your garden needs. If you do not test, use a balanced vegetable fertilizer according to label directions. Avoid dumping on excessive nitrogen. Too much nitrogen can produce huge vines with very few fruits, which is basically the plant version of all talk and no melon.
4. Wait Until the Soil Is Warm
Do not rush watermelon planting. Seeds germinate best when soil temperatures are warm, generally around 65°F or higher. Planting too early in cold soil can cause slow germination, weak seedlings, or seed rot. In most regions, wait until all danger of frost has passed and the weather has settled into a warm pattern.
If your growing season is short, start seeds indoors about 3 to 4 weeks before transplanting. Use biodegradable pots or handle seedlings gently because watermelons dislike root disturbance. Transplant outdoors only after the soil has warmed and nighttime temperatures are friendly. A watermelon seedling dropped into cold soil will not thank you; it will simply sulk.
5. Plant Seeds or Transplants With Plenty of Space
Watermelon vines need room. Plant seeds about 1 inch deep, usually in hills or mounds spaced several feet apart. If transplanting, space plants according to the variety’s mature vine size. Compact types need less room, while traditional vining types can stretch impressively across the garden.
For square watermelon growing, space matters even more because you need room to inspect the fruit, position the mold, and adjust support. Crowded vines make it harder to spot young melons at the right stage. Give the plant enough space so you can move around without stepping on vines like a clumsy garden giant.
6. Use Mulch to Warm Soil and Control Weeds
Mulch helps watermelon plants grow steadily. Black plastic mulch is commonly used by growers because it warms the soil, suppresses weeds, and helps conserve moisture. Organic mulch such as straw can also work once the soil is warm, but applying it too early may keep the ground cool.
Weed control is especially important during the first few weeks after planting. Young watermelon plants do not like competition. Keep the bed clean with shallow cultivation or hand weeding. Be careful around the roots because watermelon roots can be shallow and sensitive. Think of weeding as garden housekeeping: boring, necessary, and oddly satisfying when done.
7. Encourage Pollination for Strong Fruit Set
Watermelons produce male and female flowers. The female flowers have a tiny swelling at the base that looks like a baby watermelon. For fruit to form, pollen must move from male flowers to female flowers, usually with help from bees and other pollinators.
Avoid spraying pesticides when the plants are blooming. If you use row covers to protect young plants from pests, remove them when flowers appear so pollinators can reach the blooms. If bee activity is low, you can hand-pollinate in the morning. Pick a fresh male flower, remove the petals, and gently brush the pollen onto the center of a female flower. It is not glamorous, but neither is waiting all summer for a melon that never shows up.
8. Choose One Healthy Young Watermelon
Once fruits begin to form, look for a healthy, evenly shaped young melon. The best candidate is usually about the size of a tennis ball to a softball, depending on the variety and mold size. The fruit should be growing quickly, attached to a healthy vine, and free from cracks, scars, insect damage, or soft spots.
Do not try to mold every fruit on the plant. Choose one or two promising melons and let the vine focus its energy. If the plant is small, remove extra fruits so the chosen melon receives more resources. Growing a square watermelon is already asking the plant to perform a party trick; do not make it juggle too.
9. Build or Buy a Strong Cube Mold
The mold is the star of the project. You can buy a square watermelon mold online, or you can make one from clear acrylic, polycarbonate, or sturdy food-safe plastic. Some gardeners experiment with wooden boxes, but clear materials make it much easier to monitor the fruit. Whatever you use, the mold must be strong enough to resist pressure as the watermelon expands.
A good mold should have ventilation holes, drainage openings, removable panels, and a small opening for the stem. It should close securely but not pinch the vine. The inside should be smooth so it does not scar the rind. Avoid flimsy containers that may crack, bend, trap heat, or collapse. A watermelon may look relaxed, but it can push against a mold with surprising determination.
10. Place the Young Melon Inside the Mold
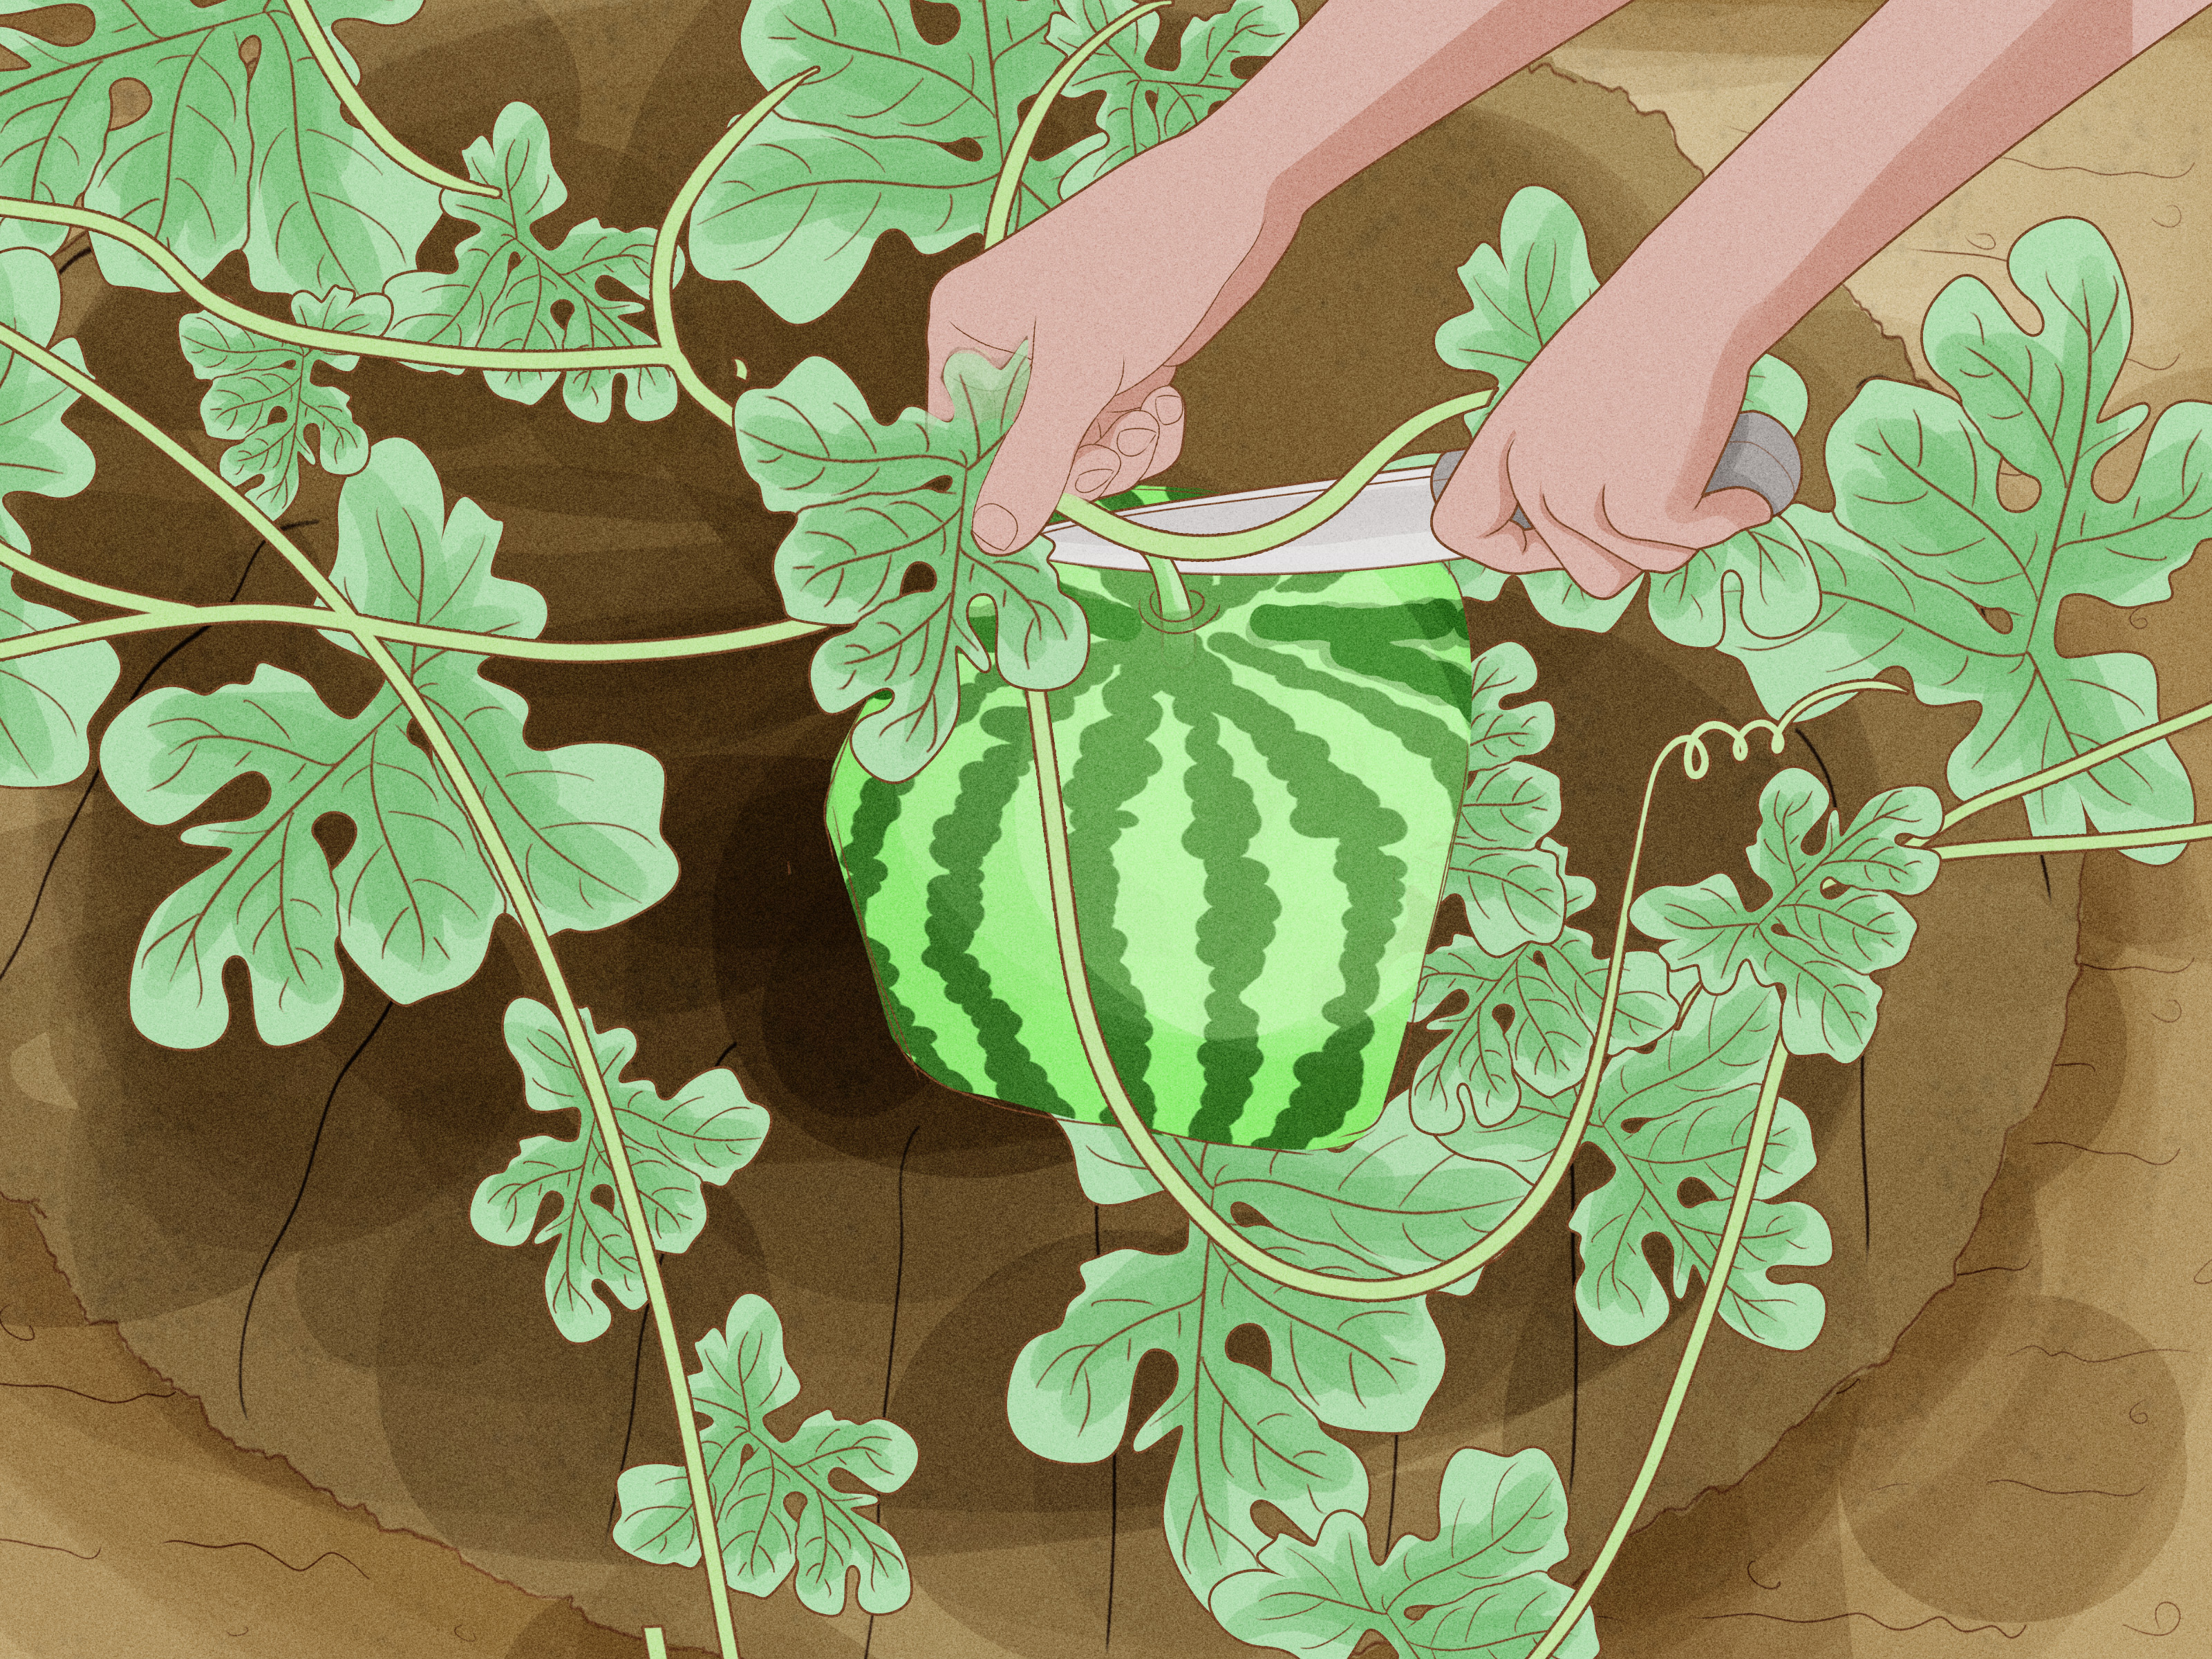
When the fruit is young and flexible, gently place it inside the cube mold. Guide the stem through the opening without twisting or bending it sharply. The fruit should sit naturally inside the container. If you have to force it, the melon is too large or the mold is too small.
Set the mold on a flat surface, board, brick, or small platform to keep it off wet soil. This reduces rot risk and keeps the cube stable. Make sure the fruit is not hanging by the vine. The mold should support the melon’s weight as it grows. Close the mold carefully and check that the vine is comfortable. Yes, your watermelon now has an apartment. Try not to let it get a better one than yours.
11. Water Consistently, but Do Not Flood the Plant
Watermelons need consistent moisture, especially during vine growth, flowering, and fruit enlargement. Deep watering encourages strong roots. Drip irrigation or watering at the base of the plant is ideal because it keeps foliage drier and reduces disease pressure.
Avoid dramatic swings between drought and overwatering. Irregular moisture can stress the plant and may contribute to cracking or poor fruit quality. However, constantly wet soil is also a problem because waterlogged roots struggle to breathe. Aim for evenly moist soil, not a swamp. Your watermelon wants a drink, not a swimming pool.
12. Inspect the Mold Often
Once the watermelon is inside the mold, check it every day or two. Look for signs of stress, overheating, moisture buildup, insect activity, or rind damage. If condensation collects inside, increase ventilation. If the melon begins pressing too hard against the walls too early, you may need a larger mold.
This inspection stage is where many square watermelon projects succeed or fail. A mold that is too tight can damage the fruit. A mold left sitting in blazing afternoon heat may become too hot. A fruit that grows unevenly may need slight repositioning. Be gentle. The goal is to guide the melon, not interrogate it.
13. Harvest at the Right Time
Harvest timing depends on your goal. If you want the sharpest cube shape, you may need to harvest before the fruit is fully ripe. This is why many decorative square watermelons are not known for amazing flavor. If you want better eating quality, allow the melon to ripen as much as possible while still fitting safely in the mold.
Traditional ripeness signs include a creamy yellow field spot where the melon rests, a duller rind, a drying tendril near the fruit stem, and the expected harvest window for the variety. Sound tests can be unreliable, especially for beginners. When ready, open the mold carefully and cut the watermelon from the vine with pruners, leaving a short stem attached. Do not yank it off. A dramatic harvest is fun until the vine fights back.
Common Mistakes When Growing a Square Watermelon
Using a Mold That Is Too Small
A tiny mold may create sharper corners, but it can also stop the fruit from developing properly. If the watermelon becomes trapped under too much pressure, it may crack, deform badly, or fail to ripen. Choose a mold slightly smaller than the mature fruit size if your goal is a firm cube, or slightly larger if flavor matters more.
Putting the Melon in the Mold Too Late
Once the rind becomes firm and the fruit is already large, it will not reshape easily. The best time is when the young watermelon is still small but clearly growing. If you wait until it is halfway mature, the mold will do very little except make the melon feel judged.
Ignoring Heat Inside the Mold
Clear molds can trap heat. In very hot climates, afternoon sun can raise temperatures inside the container and stress the fruit. Ventilation holes, light shading during extreme heat, and regular checks help prevent damage.
Forgetting About Pollinators
No pollination, no watermelon. If your plants flower but do not set fruit, check whether bees are visiting. Avoid insecticides during bloom, plant pollinator-friendly flowers nearby, and hand-pollinate if needed.
Expecting Grocery-Store Perfection on the First Try
Square watermelons are novelty crops. Your first attempt may come out slightly lopsided, rectangular, or “abstract modern art.” That is normal. Each season teaches you more about timing, mold size, watering, and variety selection.
Can You Eat a Square Watermelon?
Yes, you can eat a square watermelon if it has ripened properly and remained healthy. However, many square watermelons are grown mainly for appearance and may be harvested before peak sweetness. A perfect cube often requires harvesting before the fruit has fully matured. That means the flesh may be pale, bland, or less juicy than a normal ripe watermelon.
If flavor is your priority, use a mold that allows the fruit to reach near-full size. You may get softer corners and a less dramatic cube, but the eating quality will usually be better. A slightly rounded square watermelon that tastes great is more satisfying than a perfect cube that eats like damp cardboard with ambition.
Best Mold Materials for Square Watermelons
The best mold material is strong, smooth, food-safe, and easy to open. Clear acrylic and polycarbonate are popular because they let you monitor growth. The panels should be thick enough to resist bending and should be fastened securely with screws, hinges, or clamps. Removable sides make harvesting easier and reduce the risk of damaging the fruit.
Wood can work for experimental molds, but it blocks visibility and may hold moisture. Thin plastic storage boxes are usually too weak. Glass is not recommended because it can break and create safety hazards. A good mold should also have rounded or smooth interior edges. Sharp corners inside the container can scar the rind as the fruit expands.
Square Watermelon Growing Timeline
Weeks 1-3: Start seeds indoors if your season is short, or wait for warm soil outdoors.
Weeks 3-5: Transplant seedlings or thin direct-seeded plants. Keep them warm, watered, and weed-free.
Weeks 5-8: Vines expand and flowers appear. Encourage pollination and watch for female flowers.
Weeks 7-10: Select a young fruit and place it inside the cube mold.
Weeks 10-13: Monitor fruit growth, moisture, ventilation, and mold pressure.
Weeks 12-15: Harvest when the fruit has shaped well and reached your preferred balance of appearance and ripeness.
Extra Experience: Lessons From Growing a Square Watermelon
The first lesson of growing a square watermelon is that the vine does not care about your design goals. You may have a perfect plan, a shiny cube mold, and the confidence of a person who watched three gardening videos in a row. The plant will still grow according to temperature, pollination, soil, water, and its own mysterious melon personality. That is part of the fun.
One of the most useful experiences is learning how fast a young watermelon can grow. A fruit that looks too small on Monday can be pressing against the mold by Friday. This is why daily checks matter once the melon is inside the box. Beginners often underestimate growth speed and choose a mold that feels generous at first but becomes tight too quickly. A little extra room is usually better than a dramatic cube disaster.
Another practical lesson is that pollination is everything. Many gardeners get excited when they see flowers, but early flowers are often male. Female flowers appear later and have that tiny melon at the base. If bees are not active, hand-pollination can save the project. Morning is the best time because flowers are fresh and pollen transfer is more effective. It feels a bit odd the first time, but after a while you start checking flowers like a professional melon matchmaker.
Water management also becomes more important than expected. A square watermelon project rewards consistency. If the plant dries out badly and then gets soaked, the fruit may develop problems. If the soil stays wet, roots suffer. The best routine is deep, even watering at the base of the plant, followed by mulch to help stabilize moisture. Once the fruit is in the mold, keeping the area dry and ventilated helps prevent rot and rind damage.
The mold itself teaches patience. Clear molds are worth the effort because you can see what is happening without opening the box constantly. Ventilation holes help reduce heat and condensation. A support board under the mold keeps it level and prevents direct contact with wet soil. Small details like these can decide whether the final fruit looks like a charming cube or a confused lump.
Finally, it helps to set the right expectation. Your first square watermelon may not look like a luxury gift fruit from Japan. It may have rounded corners, one flat side, or a shape best described as “cube-adjacent.” That is still a success. You trained a living fruit to grow into a box. That is more impressive than most weekend projects, and it gives you a story people will actually want to hear at a barbecue.
If you want better results the next season, keep notes. Record the variety, planting date, pollination date, fruit size when placed in the mold, mold dimensions, watering routine, and harvest date. This simple garden journal turns guesswork into strategy. By the second or third attempt, you will know exactly when to place the fruit, how much room to allow, and which variety behaves best in your climate. The square watermelon may begin as a novelty, but it quickly becomes a surprisingly good lesson in plant growth, timing, observation, and humility.
Conclusion
Growing a square watermelon is part gardening project, part science experiment, and part edible comedy. The process is not about finding rare square watermelon seeds. It is about growing a healthy watermelon vine and shaping one young fruit inside a strong cube mold. Success depends on warm soil, full sun, fertile ground, pollination, steady moisture, and careful timing.
For the sharpest shape, use a sturdy mold and place the fruit inside when it is still young. For better flavor, give the melon enough space to ripen and accept that the corners may be softer. Either way, the project is memorable, kid-friendly, photo-worthy, and surprisingly educational. Even if your first square watermelon is not perfect, it will still be the fruit everyone talks about. Round watermelons are delicious, but square watermelons have personality.