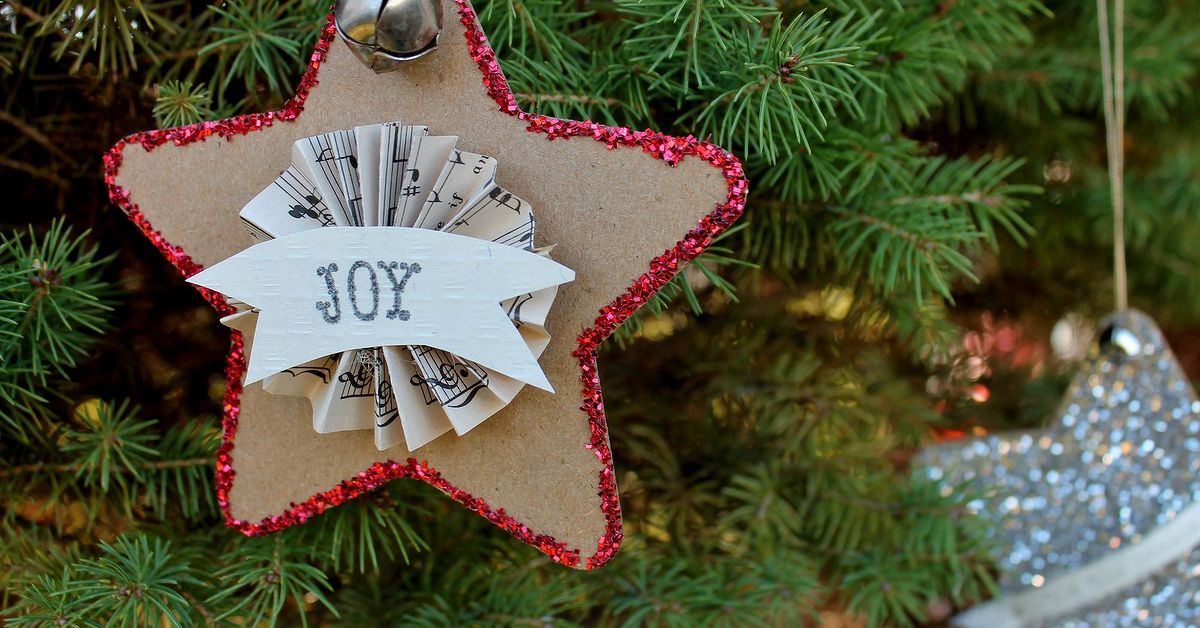
Some holiday decorations arrive in velvet-lined boxes with price tags that make your wallet whisper, “Please, no.” Others begin life as humble cardboard from a delivery box, cereal package, or shipping sleeve and somehow end up looking like they were discovered in a charming antique shop next to a brass candlestick and a suspiciously expensive pinecone. That is the magic of vintage upcycled cardboard star ornaments.
These handmade stars are budget-friendly, earth-conscious, nostalgic, and surprisingly elegant. They turn scrap cardboard into warm, textured Christmas ornaments with old-world personality. Think aged book pages, muted gold paint, twine loops, coffee-stained edges, sheet music, kraft paper, lace scraps, and a little sparkle that says “festive” without screaming “craft explosion in aisle seven.”
Whether you want rustic farmhouse Christmas ornaments, vintage paper star decorations, eco-friendly holiday crafts, or a weekend DIY project that does not require a garage full of power tools, cardboard stars are a perfect place to start. They are simple enough for beginners, customizable enough for serious crafters, and forgiving enough that a slightly crooked point looks intentional. We call that “handmade character.” Very convenient.
Why Vintage Upcycled Cardboard Star Ornaments Are Having a Moment
Holiday decorating has shifted toward pieces that feel personal, meaningful, and less disposable. Many homeowners are mixing heirloom-style ornaments with handmade accents, natural textures, and recycled materials. Cardboard fits beautifully into that trend because it is easy to find, easy to cut, lightweight, and sturdy enough to hold shape when layered.
Upcycling also gives common household waste a second life. Instead of tossing a box into the recycling bin immediately, you can transform it into something decorative and memorable. The result is not just a craft; it is a tiny rebellion against the idea that everything festive must be bought new, wrapped in plastic, and shipped from three time zones away.
The vintage style adds another layer of charm. Cardboard naturally has a warm, neutral tone that pairs well with aged paper, antique metallics, burlap, cotton ribbon, dried orange slices, evergreen garlands, and soft white lights. In other words, cardboard already knows how to dress for Christmas. It just needs a little encouragement.
What Makes These Cardboard Star Ornaments “Vintage”?
Vintage-inspired design is less about actual age and more about atmosphere. A cardboard star becomes vintage when it looks collected, timeworn, and lovingly imperfect. You can create that effect with color, texture, and finishing details.
1. Aged Paper Layers
Old book pages, vintage-style scrapbook paper, sheet music, dictionary pages, brown kraft paper, and tea-stained printer paper are perfect for covering cardboard stars. The printed text or musical notes add instant nostalgia. If you use old books, choose damaged or unwanted copies rather than cutting up anything rare or valuable. Your ornament should not come with literary guilt.
2. Muted Holiday Colors
Classic vintage Christmas palettes often include ivory, cream, antique gold, tarnished silver, cranberry red, forest green, soft brown, and faded black. These colors look beautiful on cardboard because they enhance the material instead of hiding it completely.
3. Distressed Edges
Rubbing brown ink, watered-down paint, or even a little cooled coffee along the edges creates a gently aged look. The goal is “found in Grandma’s attic,” not “survived a chimney incident.” Use a light hand and build color slowly.
4. Simple Embellishments
Twine, jute, lace, buttons, tiny bells, wooden beads, old ribbon, and dried botanicals help finish the ornament. A single well-placed bow often looks better than twelve competing decorations. Vintage style likes restraint. Your glue gun may disagree, but stay strong.
Materials You Will Need
One reason DIY cardboard star ornaments are so popular is that the supply list is wonderfully low-pressure. Most items are probably already hiding in a drawer, bin, closet, or that mysterious craft bag you promised to organize last January.
- Clean cardboard from shipping boxes, cereal boxes, or packaging
- Star template or cookie cutter for tracing
- Pencil
- Scissors or craft knife
- Cutting mat if using a knife
- White glue, craft glue, or decoupage medium
- Old book pages, sheet music, kraft paper, or scrapbook paper
- Paint in ivory, brown, gold, silver, red, or green
- Foam brush or small paintbrush
- Twine, ribbon, or string for hanging
- Optional embellishments: buttons, lace, bells, beads, glitter alternatives, dried orange peel, or small greenery sprigs
For a more sustainable ornament, avoid plastic-heavy embellishments and traditional glitter. If you love shimmer, try mica-style craft paint, metallic watercolor, gold wax, or a light dusting of biodegradable sparkle. A vintage ornament can glow without shedding tiny disco confetti across your living room for the next six months.
Step-by-Step: How to Make Vintage Upcycled Cardboard Star Ornaments
Step 1: Choose and Prepare Your Cardboard
Select clean, dry cardboard. Corrugated shipping boxes create thicker rustic stars, while cereal boxes or food packaging make thinner, smoother ornaments. If the cardboard has printed branding, do not worry. You can cover it with paper, paint, or both.
For a sturdy ornament, use two matching cardboard stars glued together. This gives the ornament weight without making it too heavy for tree branches. If you want a dimensional look, cut one large star and one smaller star, then layer them with foam tape or a folded cardboard spacer.
Step 2: Trace Your Star Shape
Use a printed star template, cookie cutter, stencil, or hand-drawn pattern. Five-point stars look classic, while eight-point stars feel more European and old-fashioned. For a tree ornament, a star between three and five inches wide usually works well. Larger stars can be used for garlands, wreaths, wall décor, or gift toppers.
Trace the shape lightly with pencil. If your first star looks like it had a disagreement with geometry, simply try again. Cardboard is patient.
Step 3: Cut the Stars
Cut slowly around the traced lines. Scissors work for thin cardboard, while a craft knife is better for thick corrugated cardboard. If children are helping, let adults handle the cutting and give kids the far more glamorous job of painting, gluing, and announcing that they need snacks.
Step 4: Cover with Vintage Paper
Brush a thin layer of glue or decoupage medium onto the cardboard star. Press your paper over the top, smoothing from the center outward. Let it dry, then trim around the edges. You can cover one side or both sides depending on whether the ornament will spin freely on the tree.
For a patchwork effect, tear small pieces of book page or sheet music and overlap them. Torn edges look softer and older than perfectly cut strips. This technique is especially helpful if your cardboard shape has small mistakes because overlapping paper hides everything. Crafting: the original photo filter.
Step 5: Add Paint and Distressing
Once the paper layer is dry, add a light wash of paint. Ivory softens busy text. Brown adds age. Gold or silver brings a festive finish. For a distressed look, dip a dry brush into paint, wipe most of it off, then lightly drag it across the surface and edges.
You can also sponge the edges with brown ink or diluted acrylic paint. Focus on corners and points where natural wear would happen. This makes the ornament look handled, cherished, and old enough to have opinions about modern wrapping paper.
Step 6: Create a Hanging Loop
Punch a small hole near the top point or glue a loop of twine to the back. If the cardboard is thick, a small awl or needle can help make the hole. Reinforce the back with a small square of paper if needed.
Twine gives a rustic farmhouse look. Velvet ribbon feels elegant. Thin gold cord adds a classic Christmas finish. For a primitive vintage style, use cotton string or torn fabric strips.
Step 7: Add Final Embellishments
Finish the ornament with small details. Try a tiny bow at the top, a button in the center, a dusting of metallic paint on the points, or a small bell tied with twine. Keep embellishments lightweight so the ornament hangs nicely.
If you want a more dramatic star, layer a smaller star on top of a larger one. Paint the top star gold and leave the bottom one covered in book pages. The contrast creates depth and makes the ornament look more expensive than it is, which is the official love language of DIY.
Creative Design Ideas for Cardboard Star Ornaments
Sheet Music Stars
Cover cardboard stars with old sheet music for a classic holiday look. Add antique gold edges and hang with black velvet ribbon. These ornaments look beautiful on trees decorated with candles, brass bells, and simple white lights.
Book Page Farmhouse Stars
Use torn book pages, brown ink, and jute twine. Add a small wooden bead to the hanging loop for a handmade farmhouse finish. These work especially well on flocked trees or evergreen garlands.
Rustic Kraft Paper Stars
Leave the cardboard mostly exposed and dry-brush it with white paint. Add a stamped word such as “joy,” “peace,” or “noel.” This style is simple, neutral, and excellent for minimalist holiday décor.
Metallic Heirloom Stars
Paint the cardboard with antique gold or champagne silver, then lightly sand the edges once dry. Add a lace scrap or tiny pearl-style bead for a delicate vintage effect. These stars look like old metal ornaments from a distance, without the weight or cost.
Quilt-Inspired Patchwork Stars
Cover each point with a different paper pattern in muted reds, creams, and greens. The finished ornament has the cozy look of a handmade quilt. It is a great way to use tiny paper scraps that are too pretty to throw away and too small to justify keeping forever. Finally, redemption for the scrap pile.
Where to Use Vintage Cardboard Star Ornaments
These ornaments are not limited to Christmas trees. Their lightweight design makes them useful all over the home. Hang them from a mantel garland, attach them to wrapped gifts, string them into a star garland, add them to wreaths, or use them as place cards for a holiday table.
For gift wrapping, write the recipient’s name on the back of the ornament. After the gift is opened, the tag becomes a keepsake. This small touch makes even plain kraft paper wrapping feel thoughtful and styled.
You can also make oversized cardboard stars for wall décor. Use thick corrugated cardboard, reinforce the back, and finish with layered paper or paint. A group of three stars in different sizes above a mantel can create a beautiful focal point without requiring expensive seasonal artwork.
Tips for Making Them Look High-End
The difference between “adorable handmade ornament” and “why does this look like a school project from 1998?” often comes down to finishing. First, use a limited color palette. Two or three colors usually look more polished than seven. Second, repeat materials across the set. If one ornament uses twine, book pages, and gold paint, let the others share those details.
Third, make the backs neat. Even if no one inspects the back of your ornament, you will know. Cover both sides with paper or paint, trim edges carefully, and hide glue blobs when possible. Glue blobs are crafty little traitors.
Finally, make ornaments in batches. A dozen matching or coordinating stars create more impact than one lonely star trying to carry the whole holiday aesthetic by itself.
Eco-Friendly Crafting Notes
Upcycled cardboard ornaments support a more mindful holiday season because they reuse materials already in your home. Cardboard and paper are commonly recyclable, but reusing them before recycling can extend their usefulness. To keep the project greener, choose water-based paints, use scraps from other crafts, avoid plastic glitter, and store finished ornaments carefully so they can be reused year after year.
When the ornaments eventually wear out, remove non-paper embellishments before recycling the cardboard portion if your local program accepts it. Recycling rules vary by location, so check your local guidance. If the ornament is heavily coated in glue, glitter, plastic gems, or mixed materials, it may not belong in the recycling bin. Sustainable crafting is partly creativity and partly not confusing the recycling facility.
Common Mistakes to Avoid
Using Wet or Greasy Cardboard
Only use clean, dry cardboard. Food grease and moisture can weaken the material and make paint or glue behave badly. Nobody wants a star ornament that curls like a potato chip.
Adding Too Much Glue
Too much glue can warp thin cardboard and wrinkle paper. Apply thin, even layers and let each layer dry before adding more.
Skipping the Edges
Raw cardboard edges can look unfinished unless that is part of your design. Paint, ink, or wrap the edges for a more polished vintage look.
Overdecorating
Vintage style works best when details feel collected, not crowded. Choose one focal embellishment and let the star shape shine.
Conclusion: Small Cardboard Stars, Big Holiday Charm
Vintage upcycled cardboard star ornaments prove that beautiful holiday décor does not need to be expensive, complicated, or brand new. With a few scraps of cardboard, paper, paint, and twine, you can create ornaments that feel warm, nostalgic, and personal. They bring texture to the Christmas tree, charm to wrapped gifts, and a satisfying sense of “I made that” to your holiday season.
Even better, these stars are flexible. Make them rustic with kraft paper, elegant with metallic paint, romantic with lace, or literary with old book pages. Create a matching set for your tree, a garland for your mantel, or handmade gift tags for friends and family. However you style them, cardboard stars carry the best kind of holiday message: use what you have, make it beautiful, and do not underestimate the decorative potential of a shipping box.
Personal Experience: What Making Vintage Cardboard Stars Teaches You
The first thing you learn while making vintage upcycled cardboard star ornaments is that cardboard has opinions. Thin cardboard wants to bend. Thick cardboard wants to fight your scissors. Corrugated cardboard leaves tiny fuzzy edges like it just woke up from a nap. But once you accept its personality, the process becomes surprisingly relaxing.
There is something comforting about tracing stars onto leftover packaging. Maybe it is the simplicity. Maybe it is the fact that the materials are not precious. If you mess up, you are not ruining expensive supplies; you are just giving a cereal box a slightly more dramatic destiny. That freedom makes the craft feel playful instead of stressful.
One of the best experiences is experimenting with paper. Old book pages create a soft, nostalgic look immediately. Sheet music feels classic and festive, especially when paired with gold paint. Brown kraft paper looks humble at first, but once the edges are brushed with white or bronze, it becomes beautifully rustic. The transformation is quick enough to feel magical but slow enough to enjoy.
Distressing the edges is where the ornaments really come alive. A plain paper-covered star can look nice, but a star with darkened points, dry-brushed paint, and a twine hanger suddenly looks like something pulled from a vintage market basket. The trick is to stop before it looks too perfect. Handmade pieces need a little unevenness. That is where the charm lives.
These ornaments are also wonderful for group crafting. Around a kitchen table, everyone develops a different style. One person goes minimalist with ivory paint and twine. Another adds buttons, bells, ribbon, and enough enthusiasm to concern the glue gun. Kids often create the boldest stars, and honestly, their confidence with embellishments deserves respect. Adults spend twenty minutes deciding where to place one button; children glue down seven and move on with their lives.
Another memorable part of this project is using the ornaments after they are finished. Hanging them on the tree feels satisfying, but using them as gift toppers may be even better. A simple wrapped package with a handmade cardboard star tied on top looks thoughtful, personal, and beautifully old-fashioned. It turns the wrapping into part of the gift.
Storage is easy, too. Because the stars are flat and lightweight, they can be tucked into a small box with tissue paper between layers. The next year, when you open the box, they already feel like tiny heirlooms. That is the funny thing about handmade decorations: they become sentimental very quickly. One year they are cardboard scraps. The next year they are “the stars we made that afternoon when the table was covered in glue and someone lost the good scissors.”
Making vintage upcycled cardboard star ornaments is not just about saving money or reducing waste, although both are excellent benefits. It is about slowing down long enough to create something with your hands. It is about giving ordinary materials a second act. It is about adding decorations to your home that carry a story, a little imperfection, and maybe one suspiciously visible fingerprint in the paint. Honestly, that fingerprint might be the best part.