A flash drive is supposed to be a tiny pocket-sized helper, not a digital raccoon carrying malware from one computer trash can to another. Unfortunately, USB drives are one of the easiest ways for viruses, worms, shortcut malware, ransomware droppers, and suspicious scripts to travel between devices. One minute you plug your flash drive into a public computer to print a document. The next minute every folder has turned into a shortcut, your files look missing, and your laptop starts behaving like it drank three energy drinks and forgot its manners.
The good news: in many cases, you can remove a virus from a flash drive without throwing the drive into the nearest volcano. The better news: you do not need to be a cybersecurity engineer with a basement full of glowing monitors. You just need a careful process, a clean computer, updated security tools, and the patience to avoid double-clicking anything suspicious.
This guide explains how to remove a virus from a flash drive using four practical methods: scanning with antivirus software, using Command Prompt to clean shortcut infections, formatting the drive, and using offline or rescue tools when the infection is stubborn. We will also cover how to protect your computer while cleaning the USB drive, how to save important files safely, and what real-world experience teaches about avoiding reinfection.
Before You Start: Stop the Virus From Spreading
Before removing malware from a USB flash drive, remember one rule: do not open the drive like nothing happened. If the flash drive is infected, double-clicking folders, shortcuts, executable files, or strange scripts may trigger the malware. That is the digital equivalent of seeing smoke under a door and saying, “Interesting, let’s add gasoline.”
Use a Safe Setup
Ideally, use a trusted computer with updated antivirus protection. If possible, disconnect from unnecessary networks while inspecting the drive. Do not copy suspicious files to your main desktop. Do not open files with strange extensions such as .exe, .vbs, .scr, .bat, .cmd, or unexpected .lnk shortcuts. A normal family photo should not be named vacation.jpg.exe. That is not a photo; that is a tiny villain wearing sunglasses.
Show File Extensions
On Windows, enable file extensions so you can see what a file really is. Open File Explorer, select View, then enable File name extensions. This helps you spot fake files, such as a document that is secretly an executable program.
If your files look missing, do not panic. Some USB viruses hide real folders and replace them with shortcuts. Your data may still be there, just hidden under system attributes. Method 2 explains how to reveal it safely.
Method 1: Scan the Flash Drive With Updated Antivirus Software
The easiest and safest first step is to scan the flash drive using trusted antivirus or antimalware software. On Windows, Microsoft Defender is built in and can scan removable drives. Many reputable security tools, including Malwarebytes, Norton, Avast, AVG, and Kaspersky, also provide scanning and malware removal features. The important part is not the brand logo; it is that the tool is legitimate, updated, and downloaded from the official provider.
How to Scan a USB Drive on Windows
Insert the flash drive, but do not open it. Open File Explorer, right-click the USB drive, and choose Scan with Microsoft Defender or the scan option for your installed security software. Let the scan finish completely. If the antivirus detects threats, choose quarantine or remove. Quarantine is often safer than manual deletion because the security tool isolates the threat and prevents it from running.
After the USB scan, run a full scan of your computer too. This matters because some flash drive viruses infect the host computer, then reinfect every USB drive you plug in later. If you clean only the flash drive but ignore the infected PC, congratulations: you have created a malware boomerang.
When to Use a Full Scan or Offline Scan
Use a full scan if your computer has shown symptoms such as slow performance, repeated pop-ups, files turning into shortcuts, unknown startup programs, or antivirus warnings every time you insert a USB drive. If the infection keeps returning, use an offline scan such as Microsoft Defender Offline or a rescue disk from a trusted security company. Offline scans run before Windows fully loads, making it harder for persistent malware to hide.
Best For
This method is best for ordinary malware infections, suspicious files, autorun threats, and cases where you want the safest first attempt. It is also the best method for beginners because it reduces the chance of accidentally deleting important files.
Method 2: Remove Shortcut Virus Files With Command Prompt
A common flash drive infection is often called the “shortcut virus.” Technically, it may be a worm, script, or malware family that hides your real folders and creates fake shortcuts. When you click the shortcut, the malware may run and then open the folder to make everything look normal. Sneaky? Yes. Clever? Unfortunately. Welcome to the annoying side of computing.
The goal of this method is to delete malicious shortcuts and reveal your original files. Use this method only after scanning the USB drive with antivirus software. If the antivirus removed active malware but your files are still hidden, Command Prompt can help restore visibility.
Step-by-Step CMD Cleanup
First, identify the drive letter of your flash drive. In File Explorer, it might appear as E:, F:, or another letter. Be absolutely sure you have the correct drive letter. Running commands on the wrong drive is how innocent folders end up needing therapy.
Open Command Prompt as administrator. Then run the following commands, replacing X: with your actual USB drive letter:
The first command moves you to the flash drive. The del *.lnk command deletes shortcut files in the current directory. The attrib command removes hidden, read-only, and system attributes from files and folders on the USB drive. This can make your original folders visible again.
What to Delete Manually
After running the commands, open the USB drive carefully. Delete suspicious files you do not recognize, especially scripts or programs in the root of the drive. Be cautious with files named like autorun.inf, desktop.ini, unknown .vbs scripts, strange .bat files, or executables with random names. However, do not randomly delete personal documents, photos, spreadsheets, or project files unless your antivirus confirms they are infected.
Best For
This method is best when your files are still present but hidden, folders have become shortcuts, or the USB drive shows strange .lnk files. It is not a replacement for antivirus scanning. Think of it as cleanup after the security guard has already kicked out the intruder.
Method 3: Back Up Clean Files and Format the Flash Drive
If the flash drive keeps showing infections, contains many suspicious files, or you simply do not trust it anymore, formatting is often the cleanest solution. Formatting erases the file system and removes files from the drive. It is like telling the USB stick, “New personality, who dis?”
Before formatting, copy only clean, necessary files to a safe temporary folder. Scan those files before moving them back to any computer or drive. Avoid copying shortcuts, unknown scripts, cracked software, installers from questionable sources, or anything your antivirus flags. Your goal is to rescue your work, not give malware a ride in a fresh suitcase.
How to Format a Flash Drive on Windows
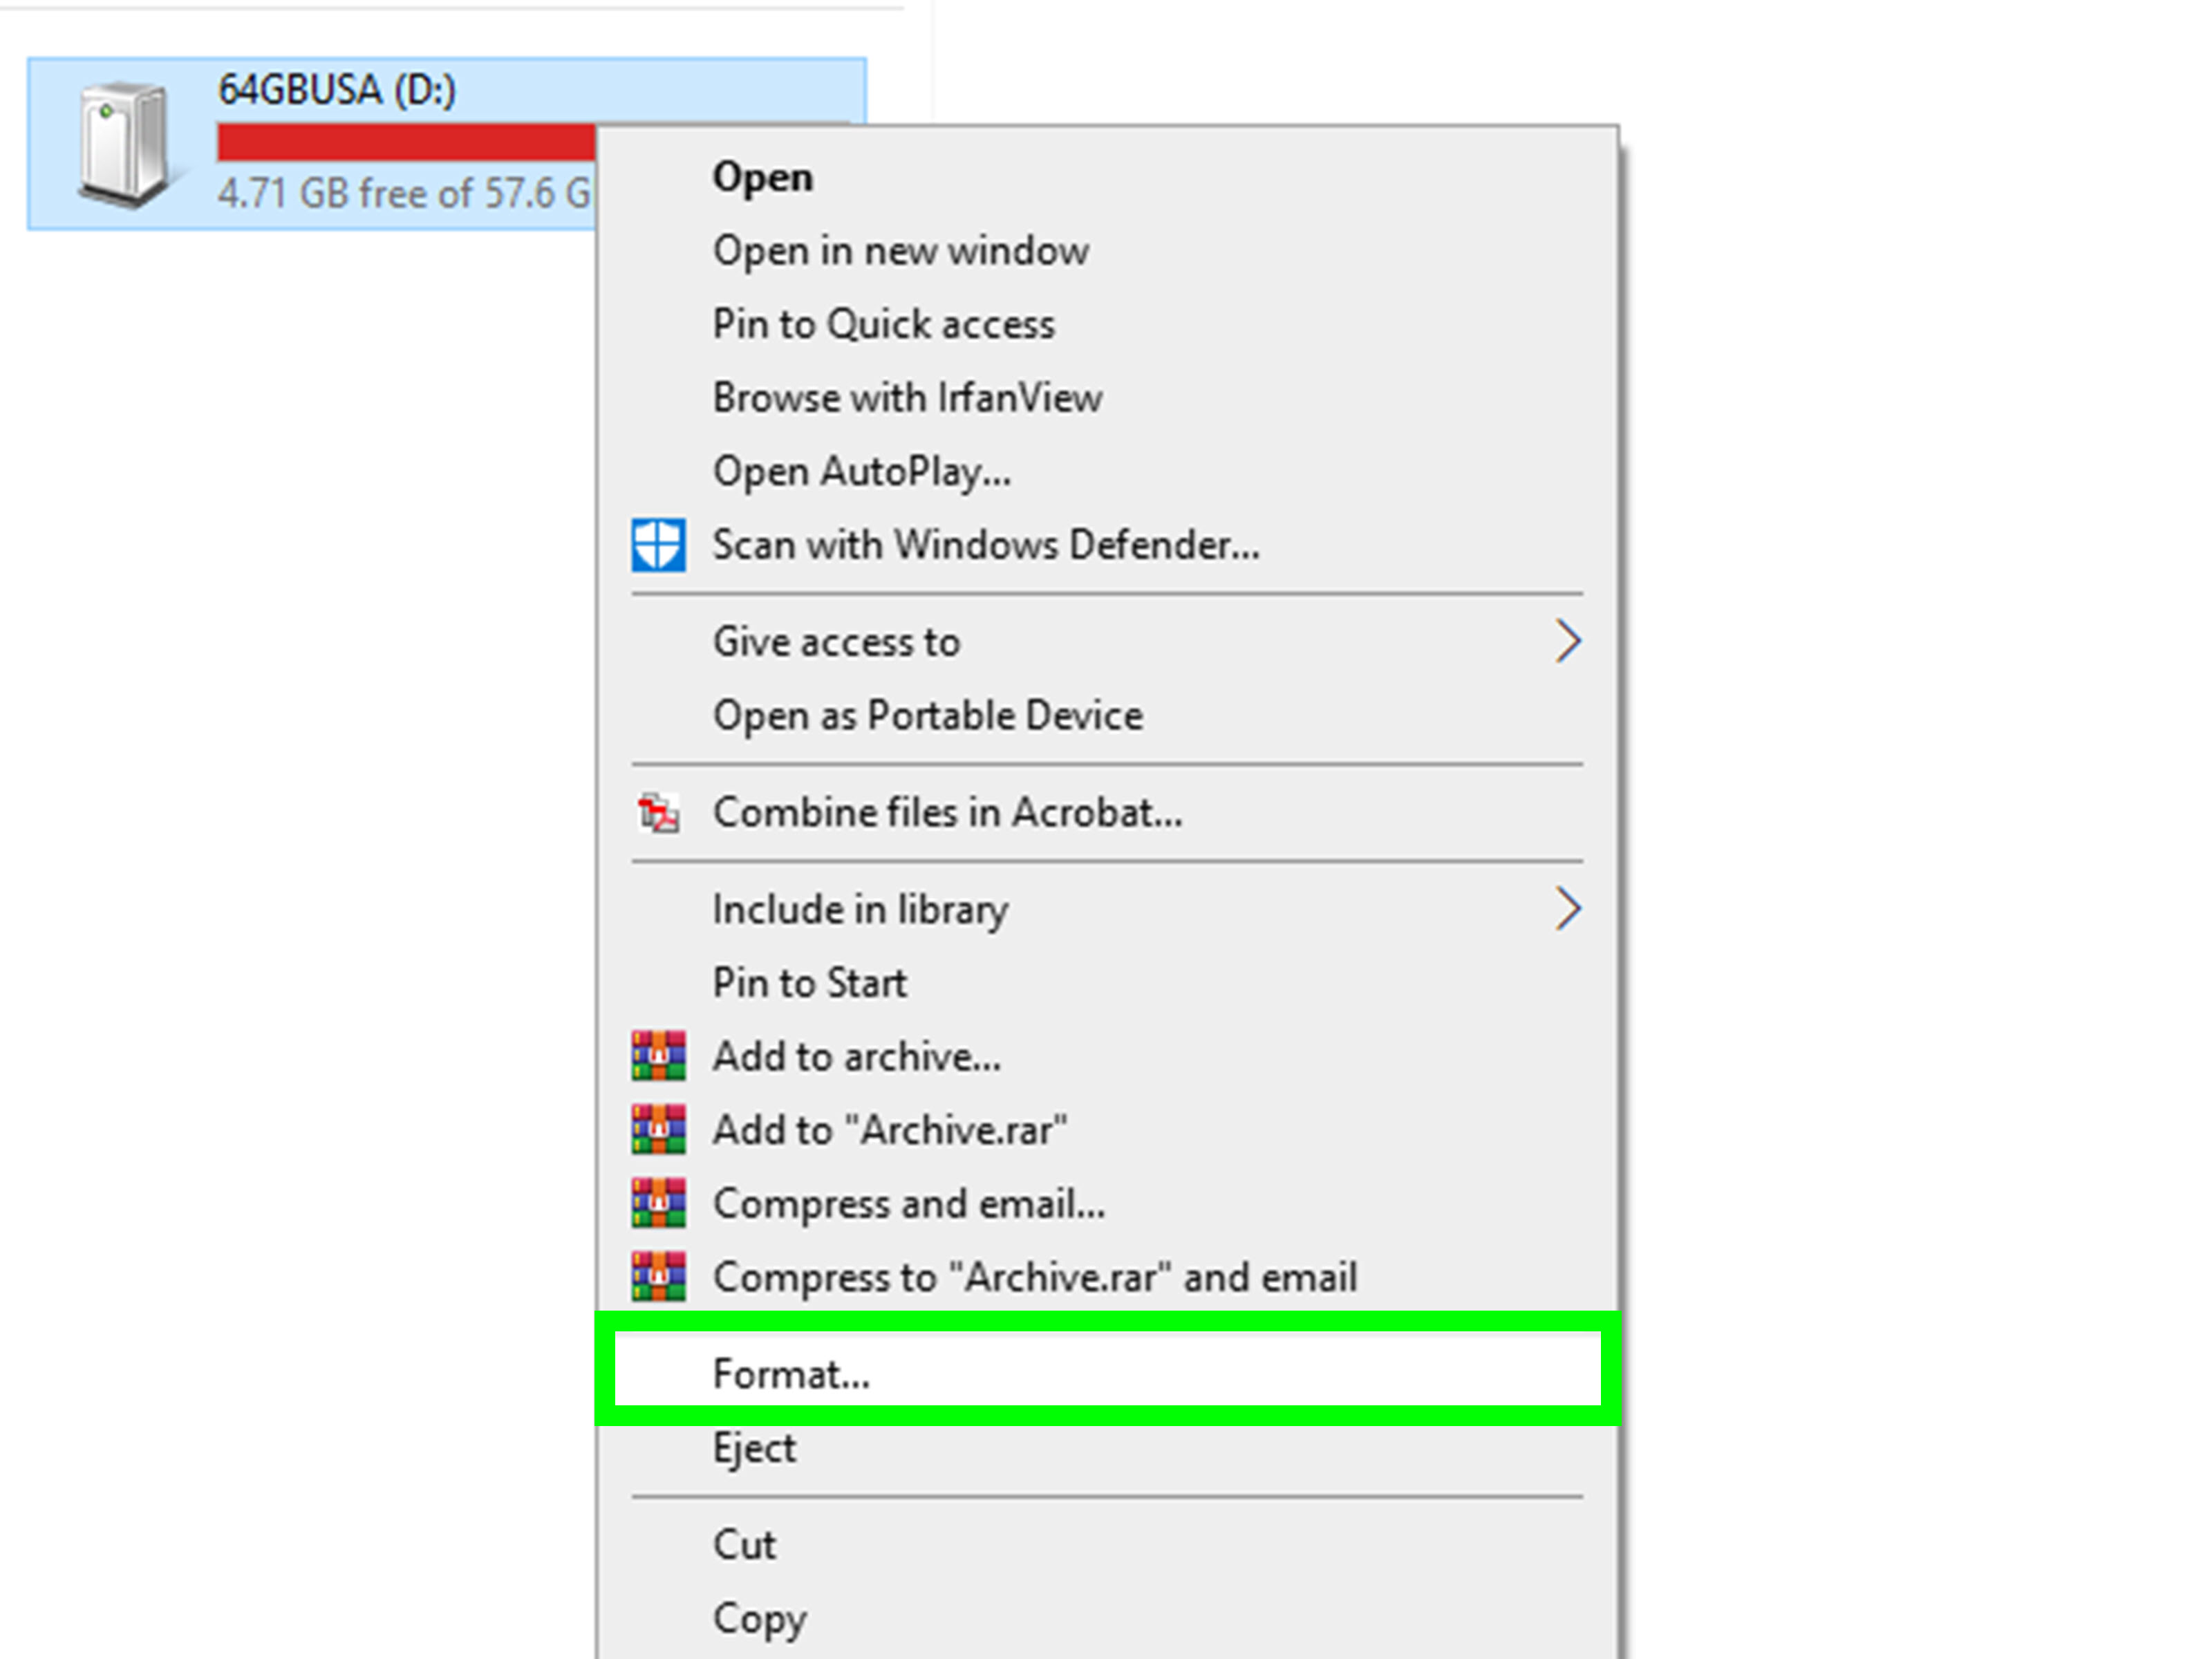
Insert the USB drive. Open File Explorer, right-click the flash drive, and choose Format. Select a file system. For general use across Windows and macOS, exFAT is often a practical choice, especially for larger drives. For older devices, FAT32 may be needed, though it has file size limits. For Windows-only use, NTFS can work well.
Uncheck Quick Format if you want a more thorough format, though it will take longer. Click Start, confirm, and wait for the process to finish. After formatting, scan the empty drive again. Then copy back only files that were scanned and confirmed clean.
How to Format a Flash Drive on Mac
Open Disk Utility. Choose View > Show All Devices. Select the flash drive itself, not just a volume under it. Click Erase. Choose a format such as exFAT for cross-platform use or APFS for Mac-focused use. Confirm the erase process. Remember: erasing a drive deletes everything on it, so make sure important files are backed up first.
Best For
This method is best when you do not need the existing files, have already backed up clean data, or want the most reliable way to remove malware from the flash drive itself. It is also useful after a shortcut virus cleanup, because formatting helps ensure hidden leftovers are gone.
Method 4: Use a Rescue Disk or Offline Malware Removal Tool
Sometimes the problem is bigger than the flash drive. If every USB drive becomes infected after connecting to one computer, the computer is probably infected. In that case, cleaning the flash drive alone is like mopping the floor while the sink is still overflowing.
A rescue disk or offline malware removal tool can help when malware is deeply embedded, blocks antivirus software, or returns after normal scans. These tools boot from a clean USB drive, DVD, or recovery environment and scan the system before the main operating system loads. This makes it harder for rootkits, boot-level malware, and stubborn threats to hide.
How to Use This Method Safely
Use a separate clean computer to download the rescue tool from the official security provider. Create the rescue media according to the provider’s instructions. Boot the infected computer from the rescue drive and run a full scan. Remove or quarantine detected threats. After the computer is clean, scan the infected flash drive again. Then format the flash drive if needed.
Do not create a rescue drive on the infected computer if you can avoid it. Malware on that machine may interfere with downloads or infect removable media. Use a trusted device instead.
Best For
This method is best when normal antivirus scans fail, the virus returns repeatedly, the computer will not start properly, or multiple USB drives become infected after connecting to the same PC.
How to Know the Flash Drive Is Clean
A clean flash drive should no longer show unknown shortcuts, suspicious scripts, strange executable files, or hidden folders that reappear after deletion. Your antivirus should complete a scan without detecting threats. Files should open normally, and the computer should not produce warnings every time the drive is inserted.
For extra confidence, scan the USB drive on a second trusted computer. If two updated security tools find nothing and the drive behaves normally after formatting, it is probably clean. No method can guarantee perfect safety forever, but layered checks dramatically reduce risk.
How to Prevent USB Viruses in the Future
Prevention is less exciting than malware removal, but so is wearing a seatbelt, and look how useful that turned out to be. Start by scanning every flash drive before opening files, especially drives used on public, school, office, library, print-shop, or shared computers. Keep Windows, macOS, browsers, and antivirus software updated. Disable AutoPlay or AutoRun behavior for removable media when possible. Avoid using unknown USB drives found in parking lots, conference rooms, classrooms, or “mystery cable drawers.”
For work environments, use approved USB devices only. Consider write-protected drives when files only need to be read, not edited. Keep backups of important files in at least two places: one local backup and one cloud or offline backup. If ransomware ever touches your flash drive, a clean backup is the difference between mild inconvenience and a dramatic staring contest with your ceiling.
Common Mistakes to Avoid
Opening the Drive Before Scanning
Many infections rely on curiosity. Do not double-click strange shortcuts or files just to “see what happens.” What happens is usually bad.
Cleaning the USB but Ignoring the Computer
If the host computer is infected, it may reinfect the flash drive. Always scan both the USB drive and the computer.
Downloading Random “USB Virus Remover” Tools
Some fake cleanup tools are malware in disguise. Use trusted security software from official websites only.
Copying Everything Back After Formatting
Formatting helps, but copying infected files back onto the drive defeats the purpose. Restore only scanned, necessary files.
Real-World Experience: What Actually Works When Cleaning an Infected Flash Drive
In real life, infected flash drives usually arrive with a story. Someone used a public computer at a print shop. A student borrowed a classmate’s laptop. An office employee moved files between old machines. A family member found “important documents” on a USB stick that had not been touched since the era when everyone thought animated desktop widgets were a good idea. The pattern is almost always the same: the drive worked fine yesterday, then suddenly every folder became a shortcut or disappeared.
The most effective approach is calm and boring, which is exactly what malware hates. First, do not open anything. Scan the drive. Then scan the computer. If shortcuts remain after the antivirus removes threats, use the attrib command to unhide files. After that, copy only personal files such as documents, photos, PDFs, and spreadsheets to a temporary folder and scan them again. Finally, format the USB drive and copy clean files back. This process sounds repetitive because it is. Repetition is what keeps malware from sneaking through the side door while you celebrate too early.
One practical lesson is that shortcut infections often make users think their files are gone. In many cases, the files are simply hidden. That is why immediately formatting the drive without checking can cause unnecessary data loss. On the other hand, trying to manually save every strange file is risky. The safest middle ground is to recover only recognizable personal files and avoid anything executable. A wedding photo should be a photo. A tax spreadsheet should be a spreadsheet. If it wants to run like a program, treat it like a raccoon wearing a business suit.
Another lesson: public computers are high-risk. Print shops, school labs, hotel business centers, and shared office PCs may be useful, but they are also places where many USB drives meet many unknown systems. If you must use a public computer, consider using cloud storage instead, or use a dedicated cheap flash drive with no sensitive data on it. Afterward, scan it before plugging it into your main computer.
For people who handle USB drives often, prevention becomes a habit. Turn on real-time protection. Keep your antivirus updated. Disable AutoPlay. Show file extensions. Back up important files. Label trusted drives. Do not plug in random devices just because they look harmless. Flash drives are small, but they can carry big problems. The best cleanup method is the one you rarely need because your security habits are already doing the heavy lifting.
Conclusion
Learning how to remove a virus from a flash drive is mostly about patience, caution, and using the right method in the right order. Start with an updated antivirus scan, clean shortcut-virus damage with Command Prompt when needed, format the drive after backing up clean files, and use rescue or offline tools if the computer itself is infected. Most importantly, do not treat USB malware as a one-device problem. Scan the flash drive, scan the computer, and change the habits that caused the infection in the first place.
A flash drive should carry your files, not a tiny malware circus. With the four methods above, you can clean the drive, protect your computer, and keep your data from becoming the next unwilling passenger on the USB virus express.