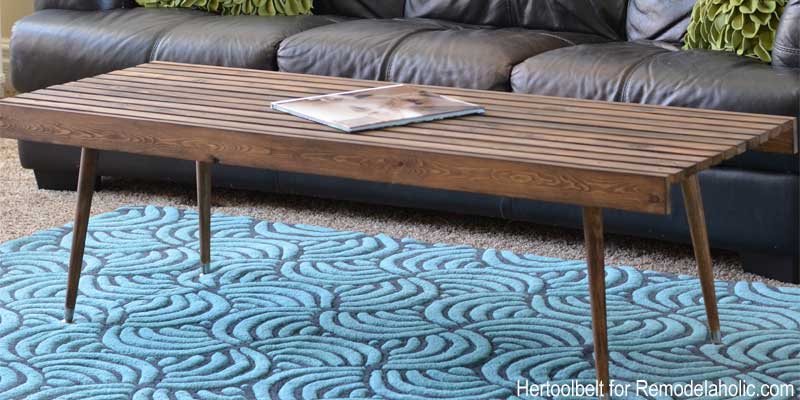
A modern slat coffee table has a useful superpower: it looks like expensive designer furniture while being built from ordinary boards, basic hardware, and one reasonably productive weekend. The evenly spaced wooden slats create crisp architectural lines, the open base keeps the design visually light, and the finished table works with modern, Scandinavian, Japandi, industrial, or midcentury-inspired interiors.
This DIY modern slat coffee table building plan produces a table approximately 44 inches long, 24 inches wide, and 17 inches high. Those dimensions provide enough surface area for drinks, books, trays, and the remote control that mysteriously disappears whenever someone wants it. The design is approachable for a beginner, but the finished result is polished enough that guests may assume it arrived in a very large box with an equally large price tag.
The plan uses dimensional lumber, pocket-hole joinery, hidden tabletop screws, and nine lengthwise slats. You can build it with pine for an affordable project, poplar for a smoother painted finish, or hardwood such as oak or maple for a more refined piece.
Modern Slat Coffee Table Dimensions
- Finished length: 44 inches
- Finished width: 24 inches
- Finished height: 17 inches
- Top configuration: Nine 1-by-3 slats
- Slat spacing: Approximately 3/16 inch
- Skill level: Beginner to intermediate
- Estimated build time: One weekend, excluding full finish-curing time
A 17-inch table height works well with many standard sofas because it keeps drinks and reading material within comfortable reach. In most living rooms, leaving approximately 14 to 18 inches between the sofa and coffee table provides a practical balance between accessibility and walking space.
Furniture dimensions and placement guidance synthesized from modern coffee-table plans and living-room layout recommendations.
Materials for the DIY Slat Coffee Table
Lumber Cut List
The following measurements assume that nominal 1-by-3 lumber is approximately 3/4 inch thick and 2 1/2 inches wide, while nominal 2-by-2 lumber is approximately 1 1/2 inches square. Measure the boards you actually purchase before cutting because lumber occasionally enjoys being unpredictable.
- 9 top slats: 1-by-3 boards cut to 44 inches
- 4 legs: 2-by-2 boards cut to 16 1/4 inches
- 2 long aprons: 1-by-3 boards cut to 41 inches
- 2 end aprons: 1-by-3 boards cut to 21 inches
- 1 center tabletop support: 1-by-3 board cut to 21 inches
- 2 optional lower end stretchers: 1-by-2 boards cut to 21 inches
Hardware and Finishing Supplies
- 1 1/4-inch coarse-thread pocket-hole screws
- 1 1/4-inch washer-head or cabinet screws for attaching the slats
- Wood glue
- Wood filler that accepts stain or paint
- 80-, 120-, 150-, and 180-grit sandpaper
- Pre-stain wood conditioner, especially when using pine
- Wood stain, furniture paint, or clear finish
- Water-based polyurethane, oil-based polyurethane, or furniture-grade topcoat
- Felt furniture pads
Recommended Tools
- Tape measure
- Pencil and marking knife
- Speed square or combination square
- Miter saw or circular saw with a straightedge guide
- Pocket-hole jig
- Drill and impact driver
- Random-orbit sander
- At least four clamps
- 3/16-inch spacer blocks
- Safety glasses, hearing protection, and a suitable dust mask or respirator
A table saw is optional. It can help straighten edges or rip wider boards into matching slats, but this plan can be completed using standard 1-by-3 lumber and a miter saw. That is good news for anyone whose workshop is technically one side of the garage and technically still occupied by a car.
Material preparation and project methods synthesized from Ana White, Kreg Tool, This Old House, Lowe’s, and The Home Depot furniture plans.
Choosing the Best Wood for a Slat Coffee Table
Pine
Pine is inexpensive, lightweight, and easy to cut. It is a sensible choice for a first DIY coffee table, but it can dent more easily than hardwood and may absorb stain unevenly. Select straight boards with minimal knots and use a compatible pre-stain conditioner when a uniform stained appearance is important.
Poplar
Poplar machines cleanly and usually has fewer troublesome knots than construction-grade pine. Its natural color can include cream, green, brown, or purple streaks, so it is often chosen for painted furniture. A deep stain can work, but always test the color on scrap material first.
Oak or Maple
Hardwood raises the material cost but creates a more durable tabletop. Oak delivers visible grain and a warm furniture-quality appearance, while maple creates a smoother, quieter surface. Hardwood also makes each slat feel more substantial, although cutting and sanding may require more patience.
How to Select Straight Boards
Place one end of each board near your eye and look along its length. Reject pieces with major bows, twists, cups, or damaged edges. Small imperfections can sometimes be corrected, but nine slats magnify inconsistencies. One warped slat may appear charmingly rustic; five warped slats may look like the table is preparing for takeoff.
Bring the lumber into the room or workshop where the table will be built and allow it to acclimate before final assembly. Store it flat with support underneath. Solid wood changes dimension as environmental moisture changes, so the top should not be attached in a way that completely prevents normal movement.
Solid-wood movement and tabletop attachment guidance synthesized from Woodworkers Source and Rockler.
Step-by-Step DIY Modern Slat Coffee Table Building Plan
Step 1: Cut and Label Every Part
Cut the nine tabletop slats to exactly 44 inches. Whenever possible, set up a stop block so every slat is identical. A difference of even 1/16 inch can become visible when all nine ends are lined up.
Cut the four legs, two long aprons, two end aprons, and center support according to the cut list. Mark each piece with painter’s tape. Labels such as “left apron” and “front leg” are more useful than relying on your memory after the workshop has been invaded by clamps, extension cords, and a suspicious quantity of sawdust.
Dry-assemble the pieces on a flat surface. Confirm that two 21-inch end aprons positioned between the 1 1/2-inch legs create a total table width of 24 inches. Likewise, the 41-inch long aprons between the legs produce the 44-inch overall length.
Step 2: Sand the Slats Before Assembly
Sanding the narrow sides of nine slats after installation is possible, but it is also an excellent way to question your recreational choices. Sand the faces, edges, and ends while the boards are still separate.
Begin with 80 grit only when the boards have milling marks, scratches, or uneven surfaces. Continue with 120 grit, then 150 or 180 grit. Do not jump directly from coarse paper to fine paper because deep scratches may remain hidden until stain makes them dramatically visible.
Lightly break the sharp edges with two or three passes of sandpaper. This small detail makes the table more comfortable to touch and helps the finish cover the edges evenly. Do not heavily round the edges unless that softer style is intentional; the crisp slat pattern is part of the modern design.
Step 3: Drill the Pocket Holes
Set the pocket-hole jig for 3/4-inch material. Drill two pocket holes at both ends of each apron. Place the holes on the inside faces so they remain hidden after assembly.
Drill two pocket holes at each end of the center support. This support will sit halfway between the end aprons and help keep the slats flat. It also reduces flex if someone places a stack of oversized art books on the tableor temporarily sits on it despite being specifically told that it is a coffee table.
Test the jig settings and screw length on scrap material. The screw should pull the joint tightly together without breaking through the outside face.
Step 4: Assemble the Two End Frames
Place two legs on a flat work surface. Position one 21-inch end apron between them, flush with the tops of the legs. Apply a thin layer of wood glue to the ends of the apron, clamp the pieces, and drive the pocket-hole screws.
Use a square to verify that each leg sits at 90 degrees to the apron. Repeat the process for the second end frame. Compare the two assemblies before the glue sets. They should match in height and width.
For additional visual structure, install an optional 1-by-2 lower stretcher between each pair of legs, approximately 4 inches above the floor. The stretchers can create a more architectural appearance, but the table will look lighter and more minimal without them.
Step 5: Connect the End Frames
Stand the two end frames upright and position the 41-inch long aprons between them. Keep the aprons flush with the tops and outside edges of the legs. Apply glue, clamp the frame, and install the pocket-hole screws.
Measure diagonally from the front-left corner to the back-right corner. Then measure the opposite diagonal. When both measurements match, the base is square. Adjust the clamps until the measurements agree before the glue begins to set.
Place the base on a known flat surface and check that all four legs make contact. A tiny wobble can often be corrected by adjusting the clamps. A major wobble usually means one component is out of square or one leg has been cut to a different length.
Step 6: Install the Center Support
Mark the midpoint of both long aprons. Position the 21-inch center support between them with its top edge flush with the apron tops. Fasten it using glue and pocket-hole screws.
Recheck the frame for square. The center support should divide the base into two equal sections and sit perpendicular to the long aprons.
Step 7: Plan the Slat Arrangement
Lay all nine slats upside down on a clean, flat surface. Place 3/16-inch spacers between them. Nine standard 1-by-3 boards have a combined width of 22 1/2 inches. Eight 3/16-inch gaps add another 1 1/2 inches, creating the intended 24-inch tabletop width.
Arrange the boards for the best grain pattern before attaching anything. Rotate individual slats or change their order until knots, color variations, and grain lines feel balanced. Mark the underside of each slat from one through nine so the arrangement survives the trip from the workbench to the base.
If you plan to stain the table, consider applying stain to the side edges before installation. Reaching evenly into narrow gaps with a brush is much harder after assembly.
Step 8: Attach the Slats from Below
Place the table base upside down over the arranged slats. Adjust it until the slat ends are flush with the ends of the base and the outer slats align with the outside edges.
Drill pilot holes through the end aprons and center support into the underside of each slat. Use 1 1/4-inch washer-head screws, carefully selecting a length that cannot penetrate the tabletop surface.
Do not apply a continuous line of glue beneath every slat. Separate solid-wood slats need a small amount of freedom to respond to humidity changes. The spaces between them already provide room for expansion, while screws installed through slightly oversized pilot holes can reduce unnecessary restraint.
Begin with the center slat, then attach the two outer slats. Reinsert the spacers and work outward from the center. This sequence helps keep the layout symmetrical instead of allowing a tiny spacing error to accumulate into one impressively large final gap.
Step 9: Complete the Final Sanding
Turn the table upright and inspect the top under strong side lighting. Sand any uneven slat ends, glue marks, pencil lines, or rough areas. Finish with 150- or 180-grit paper for most stained furniture projects.
Vacuum the table thoroughly, including the gaps and pocket holes. Wipe away remaining dust with a clean, lint-free cloth appropriate for the finish you intend to use. Dust left between slats has an uncanny ability to reappear in the wet topcoat at exactly the wrong moment.
Sanding sequence and finishing preparation synthesized from WOOD Magazine and General Finishes.
Step 10: Apply Stain, Paint, and Protective Finish
Test the complete finishing system on leftover wood from the same boards. A stain sample displayed on a store card may look completely different on pine, poplar, oak, or maple.
When staining pine, apply a compatible wood conditioner according to the manufacturer’s directions. Work in manageable sections, maintain a wet edge, and remove excess stain consistently. Pay special attention to the end grain because it can absorb more pigment and become much darker than the long grain.
For a natural Scandinavian finish, use a clear matte or satin topcoat. For a warmer midcentury appearance, choose a walnut or medium-brown stain. A black-painted base with natural wood slats creates contrast, while an all-black finish gives the table a bold architectural look.
Apply the protective topcoat in thin, even coats. Follow the product label for drying time, sanding between coats, ventilation, application temperature, and the recommended number of coats. Stir water-based finishes gently rather than shaking the container, which can introduce bubbles.
A coffee table must tolerate condensation, snacks, cleaning, and frequent handling, so a durable furniture topcoat is worth the extra step. Allow the finish to cure fully before placing heavy decorations, rubber-backed objects, or wet drinkware on the surface.
Finish selection, application, and curing guidance synthesized from This Old House, WOOD Magazine, General Finishes, and The Home Depot.
Woodworking Safety for This Project
Wear eye protection whenever cutting, drilling, or sanding. Use hearing protection around saws and other loud equipment. Connect available dust collection to power tools and work in a well-ventilated area.
Woodworking operations can create considerable quantities of fine dust. Use an appropriate dust mask or respirator, particularly when sanding. Keep guards and safety devices installed, secure workpieces with clamps, and allow blades to stop completely before reaching near the cutting area.
Never hold a short board near a moving blade with your fingers alone. Use a suitable jig, support, clamp, or push device. Read the operating instructions for every tool and finishing product involved in the project.
Woodworking and wood-dust safety guidance synthesized from OSHA and NIOSH.
Modern Coffee Table Customization Ideas
Change the Length
For a small apartment, reduce the slats and long aprons to produce a table around 36 to 40 inches long. For a long sectional sofa, increase the table to 48 or 52 inches. Add another center support when substantially increasing the length.
Use Narrower Slats
Rip boards into narrower strips for a finer, more detailed rhythm. Narrow slats look elegant but require more cutting, sanding, spacing, and fastening. They also provide more opportunities for one gap to wander off on an independent adventure.
Add Rounded Corners
Round the outside corners of the first and ninth slats with a jigsaw and template. Sand the curves smooth before assembly. Rounded corners can make the table more comfortable in narrow walkways and homes with young children.
Create a Two-Tone Finish
Paint the base matte black, charcoal, cream, or muted green while leaving the slats natural. Finish the pieces separately before final tabletop installation for cleaner transitions between colors.
Add a Lower Shelf
Install lower side rails and a second set of shorter slats to create storage for books or baskets. Keep the lower shelf visually lighter than the top so the coffee table does not become overly bulky.
Common Slat Coffee Table Mistakes
Attaching Warped Boards and Hoping for the Best
Screws can pull down a mildly bowed slat, but they cannot transform severely twisted lumber into fine furniture. Starting with straight material saves more time than any clever correction later.
Skipping the Dry Fit
A dry fit reveals incorrect cuts, misplaced pocket holes, visible defects, and alignment problems before glue raises the emotional stakes.
Ignoring the Actual Board Width
Do not assume every 1-by-3 is exactly 2 1/2 inches wide. Measure all nine boards and calculate the combined width before making spacer blocks.
Using Random Objects as Spacers
Coins, pencils, and folded cardboard may seem convenient, but their dimensions may vary. Cut several identical spacers from scrap wood or plastic and use them throughout the assembly.
Overdriving Pocket Screws
Pocket screws need to pull the joint closed, not excavate a tunnel through the leg. Reduce the drill clutch setting and stop as soon as the joint becomes tight.
Applying Finish Inside a Dusty Workshop
Clean the work area before opening the finish. Allow airborne dust to settle, vacuum the table, and avoid sanding another project beside a freshly coated tabletop.
How to Maintain a Wooden Slat Coffee Table
Clean the table with a soft, slightly damp cloth, then dry it promptly. Avoid saturating the gaps with water. Use coasters under cold drinks and trivets under hot objects, even when the finish claims impressive durability.
Dust between the slats using a soft brush, vacuum attachment, or microfiber cloth wrapped around a thin ruler. Inspect the screws occasionally, particularly during the table’s first year as the lumber adjusts to seasonal humidity.
Minor scratches can often be disguised with a compatible furniture touch-up marker. Deeper damage may require localized sanding and recoating. Always test repair products on an inconspicuous area first.
Extended Builder Experience: What a Weekend Slat-Table Project Usually Teaches You
The most important practical lesson from building a modern slat coffee table is that simple furniture is not necessarily careless furniture. The design contains few parts, but the repeated slats make every small inconsistency easier to see. A complicated cabinet can sometimes hide a slightly imperfect cut inside a corner. A slatted tabletop displays nine boards in a straight line like witnesses waiting to describe exactly what happened.
Board selection therefore has a surprisingly large influence on the finished piece. Builders who spend an additional 15 minutes comparing lumber at the store often save an hour of corrective sanding and clamping later. Straight boards sit naturally against the supports, maintain uniform gaps, and require less force from the screws. Twisted boards fight the assembly from beginning to end.
Another common experience is discovering that repetitive cutting becomes easier when a stop block is used. Measuring and marking nine separate slats sounds sensible, but tiny pencil and cutting differences quickly accumulate. Setting a stop once produces matching parts more reliably. The same principle applies to spacer blocks: consistency beats improvisation.
The dry assembly often becomes the project’s most valuable checkpoint. This is where builders notice that pocket holes face the wrong direction, an apron is slightly too long, or the prettiest face of a board has accidentally been positioned underneath. Rearranging dry parts costs nothing. Rearranging glued parts involves vocabulary that is not normally included in respectable woodworking articles.
Sanding the individual slats before assembly also feels like an optional luxury until someone tries to push folded sandpaper through eight narrow gaps. Pre-sanding saves time and creates a more consistent surface. Pre-finishing the side edges can be equally helpful, especially when applying a dark stain that would reveal any missed strip of bare wood.
The tabletop-spacing stage usually requires more patience than expected. A builder may position the first few slats perfectly, then discover that the final opening is too wide because each earlier gap was barely oversized. Attaching the center slat and two outer slats first creates fixed reference points. Working outward symmetrically prevents the spacing error from migrating to one side.
Finishing is another stage where restraint produces better results. Heavy stain does not compensate for rushed sanding, and a thick topcoat does not necessarily create stronger protection. Thin, controlled applications are easier to level and less likely to develop drips around the gaps. The finish should be allowed to dry and cure according to its instructions rather than according to how urgently the living room needs a table.
Finally, builders often discover that a handmade coffee table feels different from mass-produced furniture. Small grain variations and carefully spaced slats give the piece character without making it look unfinished. The table becomes both a useful object and a record of newly learned skills: accurate measuring, square assembly, hidden fastening, surface preparation, and patient finishing. Even when the first build includes a tiny flaw, most people see the overall designnot the one gap the builder continues examining from across the room.
Conclusion
This DIY modern slat coffee table building plan combines beginner-friendly construction with a clean furniture-store appearance. The project depends less on advanced joinery than on accurate cuts, straight lumber, careful alignment, and consistent slat spacing. Build the base square, prepare the slats before assembly, attach the top from underneath, and give the finish enough time to cure. The reward is a durable modern coffee table customized to your room, your preferred wood, and your decorating style.
Note: Lumber dimensions, fastener requirements, drying periods, and safety procedures can vary by material and product. Measure the actual boards and follow the instructions supplied with your tools, screws, adhesives, stains, and protective finishes.