Jack Skellington is one of those Halloween icons who looks fancy, spooky, theatrical, and oddly charming all at once. He is the Pumpkin King of Halloween Town, but let’s be honest: his real superpower is making a pinstripe suit look like it has been haunted by jazz music. If you want a costume that is recognizable from across the room, works for Halloween parties, cosplay events, school spirit days, themed movie nights, or a dramatic walk to the mailbox, a DIY Jack Skellington costume is a fantastic choice.
The good news is that you do not need a Hollywood costume department, a fog machine, or a skeleton body imported from Halloween Town. With a black suit, white fabric paint, a bat bow tie, skull-style makeup, and a little patience, you can build a convincing Jack Skellington costume at home. This guide breaks the process into 14 clear steps, from planning the look to adding final details that make the costume feel polished instead of “I made this at midnight with panic and glue.”
Before you begin, remember the three visual rules of Jack Skellington: long and lean silhouette, black-and-white pinstripe suit, and a round skeletal face with a stitched smile. Nail those, and people will recognize you before you even say, “What’s this?”
Materials You’ll Need
- Black suit jacket or thrifted blazer
- Black dress pants
- White fabric paint or fabric marker
- Small paintbrushes and ruler or painter’s tape
- White dress shirt or mock shirt front
- Black dress shoes or boots
- White gloves or skeleton gloves
- Black craft foam, felt, or stiff fabric for the bat bow tie
- Hot glue gun or fabric glue
- White face paint or pale foundation
- Black eyeliner, black face paint, or cream makeup
- Makeup sponge, fine brush, setting powder, and makeup remover
- Optional: black morph hood, bald cap, or white beanie for a rounded head effect
How to Create a Jack Skellington Costume in 14 Steps
Step 1: Study Jack’s Signature Look
Start by looking closely at Jack’s outfit. His costume is not simply “skeleton in a suit.” It is a tall, elegant, slightly crooked tuxedo-style suit with narrow white pinstripes, a dramatic bat-shaped bow tie, black shoes, white skeletal hands, and a pale skull face. The more you understand the shapes, the easier it is to simplify them without losing the character.
Focus on the big details first. The pinstripes should read clearly from a distance. The bow tie should look like bat wings, not a regular prom bow. The mouth should stretch into a stitched grin. Tiny perfection is nice, but bold character details are what make the costume work.
Step 2: Choose Your Base Suit
A black suit is the foundation of this DIY Jack Skellington costume. A thrift store blazer and pants are perfect because you will be painting them, adjusting them, and possibly getting glue on them. Look for a jacket that is slightly long, slim, and dramatic. If you can find a tailcoat or tuxedo jacket, even better. Jack is not exactly business casual; he is more “haunted orchestra conductor.”
If the jacket is too boxy, you can fake a slimmer silhouette by wearing it open over a white shirt and adding bold vertical stripes. For kids, black pajamas or a black tracksuit can work as a comfortable base. For adults, a fitted blazer and tapered pants create the cleanest look.
Step 3: Plan the Pinstripes Before Painting
Do not attack the suit with paint immediately. That path leads to wobbly lines, regret, and possibly a jacket that looks like a zebra had a stressful day. Lay the jacket and pants flat on a table or cardboard surface. Use a ruler, chalk, or removable fabric pencil to mark vertical lines about one inch apart.
Jack’s stripes do not have to be machine-perfect. In fact, slightly imperfect lines can make the costume feel more handmade and eerie. Still, try to keep the spacing consistent. Use painter’s tape if you want crisp edges, or freehand the lines if you prefer a sketchy Tim Burton-inspired vibe.
Step 4: Paint the Jacket
Use white fabric paint and a thin brush to paint the pinstripes down the jacket. Start at the shoulders and move downward in long, steady strokes. Paint the sleeves separately, following the arm length from shoulder to cuff. Add stripes to the lapels, too, because Jack’s suit is visually busy in the best possible way.
Let the front dry completely before flipping the jacket over. Rushing this step is how you accidentally decorate your dining table with ghostly fingerprints. Once dry, paint the back. If the fabric absorbs paint quickly, add a second coat after the first one dries.
Step 5: Paint the Pants
Lay the pants flat and secure them with pins or clips so they do not shift. Paint vertical stripes from the waistband to the hem. When the front is dry, flip them over and repeat. The pants matter more than people think because the full vertical stripe effect makes the body look taller and more skeletal.
If you want a faster method, use white fabric markers. They are less messy and easier for younger costume makers. The tradeoff is that markers may be less bright than paint, especially on thicker black fabric.
Step 6: Create the White Shirt Area
Jack wears a formal-looking shirt under his striped jacket. The simplest option is a plain white dress shirt. If you are building a lightweight costume, you can cut the front panel from an old white shirt and attach it inside the jacket so it appears layered without adding bulk.
For a cartoon-like effect, add a large white button shape in the center of the jacket. You can make it from white felt, craft foam, polymer clay, or even a painted cardboard circle. Oversized details photograph well, especially at night or in party lighting.
Step 7: Make the Bat Bow Tie
The bat bow tie is the crown jewel of the costume. Without it, you may look like a spooky accountant. With it, you become the Pumpkin King. Cut two wing shapes from black craft foam, felt, or stiff fabric. The wings should stretch outward and slightly upward, like a bat preparing to deliver a dramatic musical number.
Add a small bat head or oval shape in the center. Use white paint to draw simple eye dots or wing details if desired. Glue the pieces together, then attach the bow tie to a black ribbon, elastic band, or safety pin. Make it large enough to be seen clearly from several feet away.
Step 8: Add Skeleton Hands
Jack’s hands are long, thin, and bony. White gloves are the easiest solution. Draw black bone lines on them with a fabric marker, or buy skeleton gloves and keep moving. If you want a more exaggerated cosplay look, glue thin foam finger extensions to the gloves, but make sure you can still hold a phone, open doors, and rescue snacks from a party table.
For children, keep gloves simple and comfortable. A costume that looks amazing but makes it impossible to eat candy has misunderstood the assignment.
Step 9: Choose the Right Shoes
Black dress shoes, boots, or plain black sneakers all work. Jack’s shoes are not the main event, but they should not break the illusion. If your shoes have bright logos or colorful soles, cover them with black tape or wear long pants that hide the details.
Comfort matters. If you plan to trick-or-treat, walk a parade route, or stand at a party for hours, choose shoes you can actually survive in. The Pumpkin King would not approve of blisters.
Step 10: Prepare Your Skin for Makeup
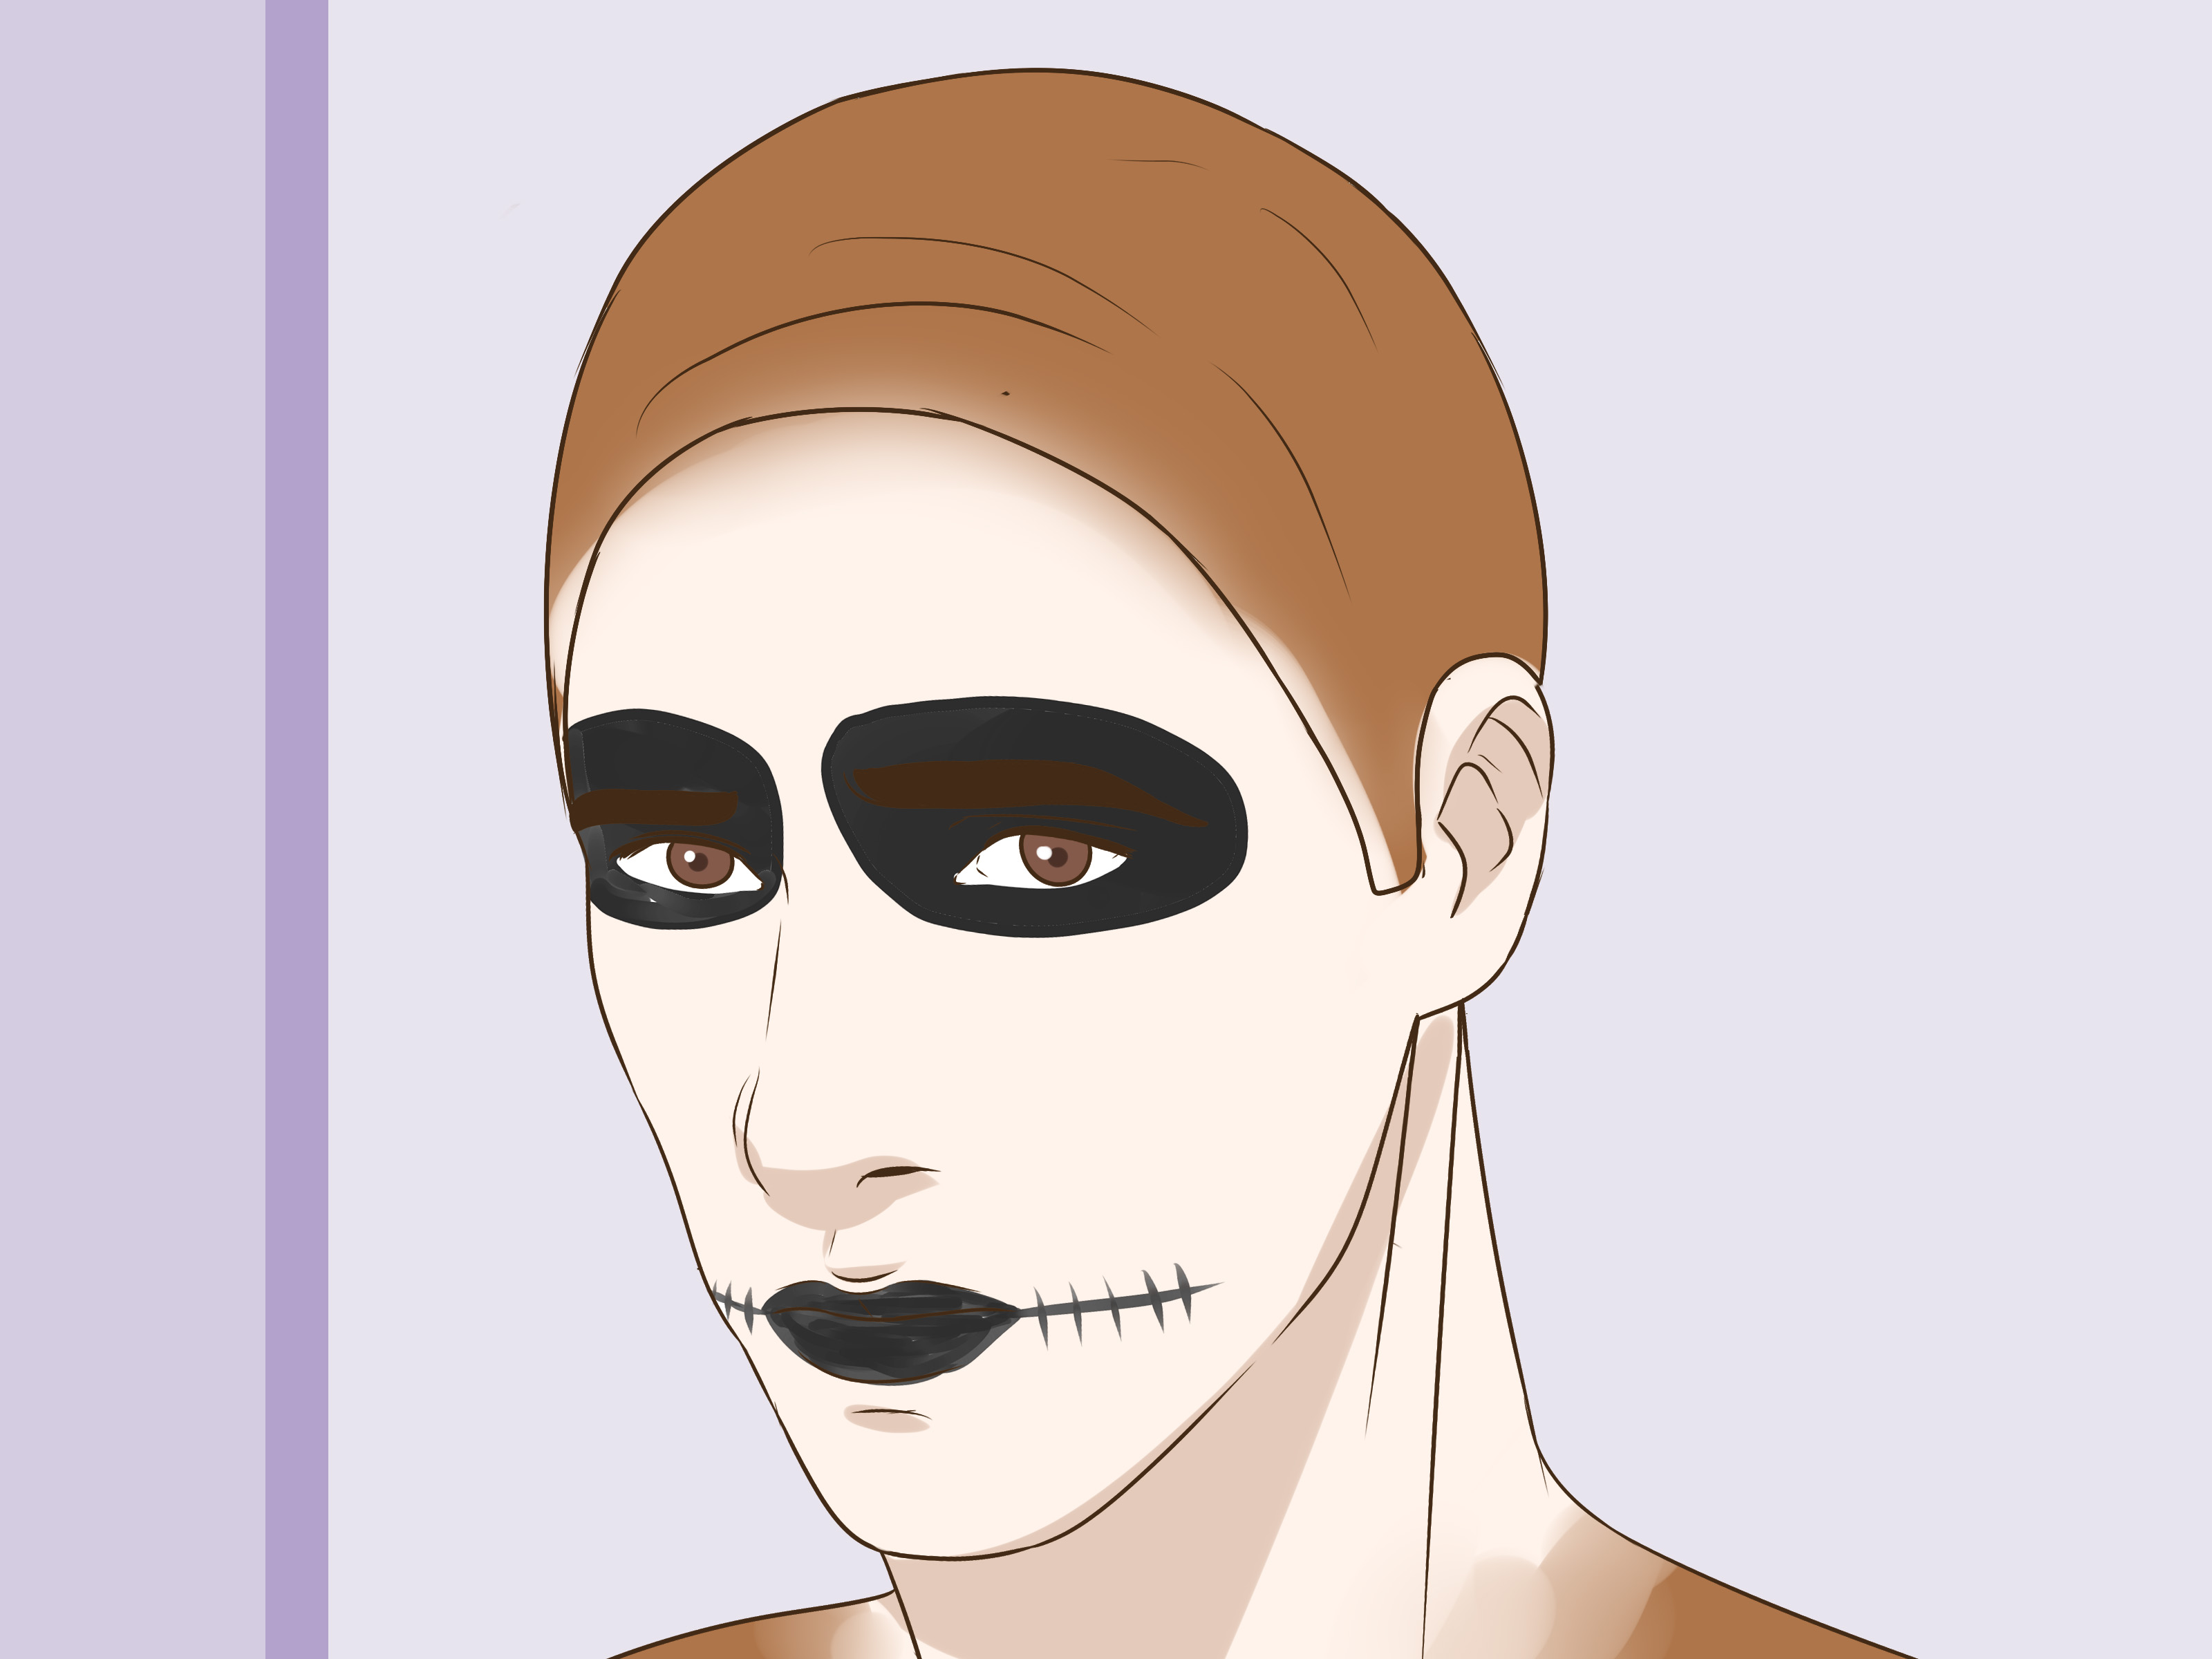
Jack Skellington makeup uses a pale base, black eyes, and a stitched smile. Before applying anything, wash your face and moisturize. If you have sensitive skin, use water-based face paint and test products on a small patch of skin before the big event. Avoid using old, dried-out Halloween makeup that has been living in a drawer since last October like a tiny cosmetic goblin.
Use a primer or barrier cream if you are applying heavy makeup. This helps the face paint sit better and makes removal easier later. Keep makeup away from the immediate eye area unless the product is labeled safe for that use.
Step 11: Apply the White Skull Base
Use a sponge to apply white face paint or a very pale foundation over your face. Build thin layers rather than one thick layer. Thick paint cracks, smears, and can make you feel like your face has been sealed in frosting. Let each layer dry slightly before adding more.
Blend down the neck if the costume collar exposes skin. For a cleaner skull effect, set the base with translucent powder. This keeps the makeup in place and reduces shine in photos.
Step 12: Draw Jack’s Eyes, Nose, and Smile
Use black face paint or eyeliner to create large hollow eye shapes. Jack’s eyes are expressive and slightly droopy, so avoid perfect circles. Think empty sockets with personality. Add two small black nostril shapes where the nose belongs.
For the mouth, draw a long curved line from cheek to cheek. Then add short vertical stitch marks along the line. Keep the stitches uneven for a handmade animated look. Fill in your lips with black makeup, then soften the edges so the grin feels connected to the face.
Step 13: Create the Rounded Skull Effect
Jack’s head is smooth and round. You can suggest this with makeup alone, or you can wear a white bald cap, white beanie, or black morph hood with face makeup applied only to the visible area. A white cap works especially well for kids because it is easier than full-head makeup.
If you use a mask, make sure you can see clearly. For safety and comfort, makeup is often better than a full mask, especially at night. You want people to admire the costume, not watch you walk into a decorative pumpkin.
Step 14: Test the Full Costume Before Wearing It Out
Put everything on at least one day before the event: suit, bow tie, gloves, shoes, makeup plan, and any head covering. Walk around. Sit down. Raise your arms. Check whether the bow tie droops, the pants drag, or the makeup transfers onto the collar.
This final test is where good costumes become great costumes. Add reflective tape inside a bag, under a cuff, or on shoes if you will be outside at night. Keep the costume away from candles or open flames. Pack a small emergency kit with safety pins, makeup sponge, black eyeliner, and tissues. Congratulations: you are now ready to bring Halloween Town energy into the human world.
DIY Jack Skellington Costume Variations
Budget Version
Use a black shirt and black pants instead of a suit. Draw pinstripes with white fabric marker, make the bat bow tie from cardboard, and use basic face paint. This version is affordable, comfortable, and still recognizable.
No-Sew Version
Use fabric glue, safety pins, and iron-on hem tape instead of sewing. Craft foam is your best friend for the bow tie because it holds shape without stitching.
Kid-Friendly Version
Choose soft black clothing, washable fabric paint, a lightweight bow tie, and minimal face paint. Keep the mouth and eyes simple. Avoid anything that blocks vision or makes walking difficult.
Cosplay Version
Upgrade the suit with a tailcoat, sharper pinstripes, foam shoulder shaping, long skeleton gloves, theatrical makeup, and a more sculpted bat bow tie. Add a prop like a small ghost dog plush or a striped cane for extra personality.
Common Mistakes to Avoid
First, do not make the stripes too thick. Jack’s suit has narrow, elegant pinstripes, not referee stripes. Second, do not skip the bow tie. It is the detail that turns a skeleton suit into Jack Skellington. Third, avoid heavy, greasy makeup if you will be wearing it for hours. It may look great at 6 p.m. and turn into abstract sadness by 10 p.m.
Also, do not leave the costume until the last minute. The paint needs time to dry, and makeup benefits from practice. A trial run can save you from discovering, too late, that your “white face paint” is actually silver glitter gel from a forgotten school play.
Safety Tips for Wearing the Costume
Choose flame-resistant fabrics when possible, especially for children. Keep loose sleeves, paper accessories, and foam pieces away from candles, fire pits, and jack-o’-lanterns with real flames. Battery-powered lights are safer for spooky atmosphere.
Make sure the costume is not too long. Pants that drag can cause trips, and Jack’s elegant walk loses some magic when it ends in a sidewalk face-plant. If you will be outdoors after dark, add reflective tape to a candy bag, shoes, or the underside of the jacket hem. It can be subtle and still help with visibility.
For makeup, use skin-safe products, test them ahead of time, and remove everything before bed. Your pillowcase does not want to become a haunted artifact.
Experience Notes: What Actually Makes This Costume Work
After making or helping with several character costumes over the years, I have learned that a Jack Skellington costume succeeds because of proportion, not perfection. People often obsess over getting every stripe exactly straight, but the real magic is the overall shape. If the body looks long, the suit looks black-and-white, and the grin stretches wide, the costume instantly reads as Jack. The human brain fills in the rest, which is convenient because the human hand is not always great at painting sixty perfect lines on a moving pair of pants.
One practical trick is to prioritize the jacket. At parties, in photos, and at front doors, most people see your upper body first. If you only have time to make one part look excellent, make it the jacket, bow tie, and face. Pants can be simpler. Shoes can be plain. But the bat bow tie should be big, crisp, and dramatic. A tiny bow tie gets swallowed by the jacket. Jack is theatrical. Let the bat wings have their moment.
Another lesson: test your makeup under the lighting where you will actually wear it. Bathroom lighting can lie. A face that looks bold in the mirror may disappear in a dim party room. Make the eyes darker and the mouth slightly more exaggerated than you think you need. The stitched smile is especially important because it gives the costume expression. Without it, the face can look like a friendly moon with eye bags.
Comfort is the hidden hero of this costume. A stiff bow tie poking your chin for four hours will slowly transform you from Pumpkin King into Grumpy Skeleton Accountant. Use lightweight foam, soft elastic, and breathable clothing. If the costume is for a child, skip complicated headpieces and use a soft hat or simple face paint. Kids want to run, sit, eat, and negotiate candy trades like tiny business executives. Build the costume around movement.
If you are making the costume for a couple or group, Jack pairs beautifully with Sally, Zero, Oogie Boogie, or other Halloween Town-inspired outfits. The best group costumes share a color palette without needing everyone to look identical. Jack’s black-and-white look also photographs well beside Sally’s patchwork colors, which makes the pair instantly recognizable.
Finally, give yourself drying time. Fabric paint always takes longer than your optimism predicts. Paint the suit at least a day in advance, preferably two. Hang it somewhere safe, check for missed spots, and touch up the lines once everything is dry. Costume-making should feel fun, not like a high-speed craft emergency. Put on the movie, make the bow tie, paint the stripes, and enjoy the process. After all, Jack’s whole story begins with curiosity. Your costume can, too.
Conclusion
Creating a Jack Skellington costume is a fun DIY project because it combines simple clothing, bold graphic details, and expressive makeup. You do not need expensive materials to get a strong result. A thrifted black suit, hand-painted pinstripes, a handmade bat bow tie, skeleton gloves, and a carefully drawn stitched smile can transform you into Halloween Town’s most stylish resident.
The key is to focus on the details people recognize immediately: the striped suit, pale skull face, black eye sockets, long grin, and bat-shaped tie. Add comfort, safety, and a little theatrical confidence, and your DIY Jack Skellington costume will be ready for Halloween parties, cosplay photos, school events, or a moonlit stroll where you dramatically wonder what this is.