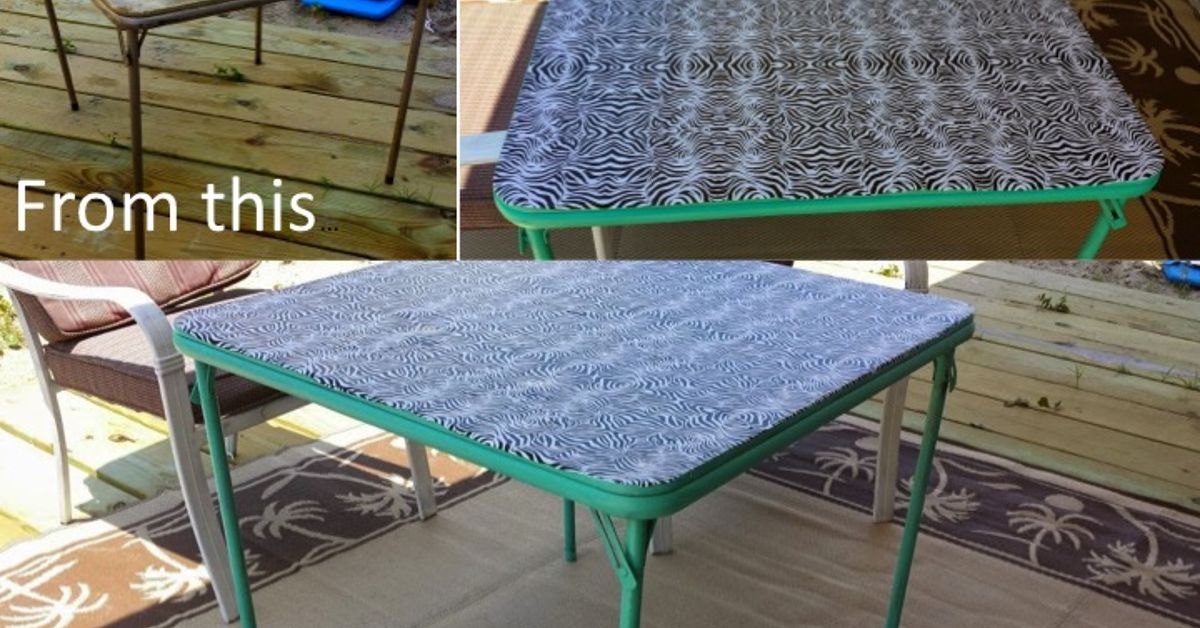
Every home has at least one object quietly auditioning for a makeover. For some people, it is a scratched dresser. For others, it is a chair with a mysterious stain nobody wants to discuss. And then there is the humble card table: practical, foldable, loyal, and usually dressed like it gave up sometime during the Clinton administration.
A card table makeover is one of the most satisfying DIY furniture projects because it is small enough for beginners, affordable enough for budget decorators, and dramatic enough to make people say, “Wait, that old thing?” Whether your folding card table is used for board games, puzzle nights, kids’ crafts, holiday overflow seating, garage-sale sorting, or emergency pizza placement, a little paint, fabric, vinyl, and patience can turn it from basement backup plan into a stylish, useful piece.
The best part? You do not need a professional workshop or a heroic collection of tools. Most card table transformations rely on basic supplies: a screwdriver, sandpaper, primer, spray paint or furniture paint, fabric or vinyl, scissors, adhesive, and a staple gun or hot glue gun. The goal is simple: refresh the base, recover the top, improve durability, and make the table look intentional instead of apologetic.
Why a Card Table Makeover Is Worth Doing
Card tables are workhorses. They fold flat, store easily, and pop up exactly when life needs extra surface area. The problem is that many older tables come with ripped vinyl, rusty metal legs, faded padding, loose screws, or colors that can only be described as “retirement-center beige.” Throwing one away may seem easier, but restoring it is often cheaper, greener, and far more fun.
A folding table makeover also gives you complete control over the final style. Want a modern black-and-white game table? Done. A cheerful floral craft table? Absolutely. A kid-friendly Lego station with wipeable vinyl? Perfect. A moody green puzzle table with brass-toned legs? Fancy enough to make your playing cards feel underdressed.
Because the project is compact, it is also a great introduction to furniture upcycling. You get to practice cleaning, sanding, painting, recovering, stretching fabric, and finishing edges without committing to a giant dining table that takes over your garage for three weeks and tests every relationship in your household.
Choose the Right Makeover Style Before You Start
Before buying supplies, decide how the table will be used. A pretty card table is nice, but a pretty card table that survives snacks, elbows, glue sticks, dice rolls, and one dramatic round of Monopoly is better.
For Game Nights
If the table will host cards, board games, or puzzles, choose a smooth, slightly cushioned top. Felt, faux suede, upholstery fabric, or a fabric layer protected by clear vinyl can work well. Avoid thick textures that make cards hard to slide or puzzle pieces wobble like tiny furniture on a haunted floor.
For Kids’ Crafts
For children’s art projects, snacks, stickers, washable markers, and glitter outbreaks, use oilcloth, laminated cotton, or wipeable vinyl. A busy pattern can hide small marks, which is useful because kids treat furniture the way raccoons treat trash cans: creatively.
For Holiday Seating
If your card table is mainly used as overflow dining space, pick a neutral fabric or faux leather top and a painted base that matches your home. A black, white, navy, sage, or warm wood-tone look can make the table blend into the room instead of announcing, “I was pulled from storage five minutes ago.”
For a Craft Room or Sewing Space
For sewing, scrapbooking, or gift wrapping, choose a surface that is smooth, durable, and easy to clean. Contact paper can be used for a quick cosmetic update, but fabric plus clear vinyl usually lasts longer on a table that gets regular use.
Supplies You May Need
A basic DIY card table makeover can be done with simple materials. You may not need everything on this list, but it helps to plan ahead before you are standing in the aisle holding six kinds of adhesive and questioning your life choices.
- Old folding card table
- Screwdriver or socket wrench
- Damp cloth and mild cleaner
- Sandpaper, usually medium and fine grit
- Painter’s tape
- Drop cloth or cardboard
- Primer suitable for metal, wood, or laminate
- Spray paint or durable furniture paint
- Fabric, oilcloth, vinyl tablecloth, faux leather, or clear vinyl
- Staple gun with short staples, hot glue gun, or strong adhesive
- Scissors or rotary cutter
- Measuring tape
- Optional foam or batting for extra cushion
- Optional clear topcoat for painted parts
The most important rule is to match the product to the surface. Metal legs need paint that bonds to metal. A glossy laminate top needs scuffing or bonding primer. Fabric that will see heavy use should be stronger than a thin decorative cotton. A card table may be humble, but it still deserves compatible materials. Honestly, don’t we all?
Step-by-Step Card Table Makeover
Step 1: Inspect the Table
Start by opening the card table and checking its condition. Look for loose screws, bent legs, rust, peeling vinyl, cracked corners, or weak hinges. If the table wobbles, tighten the hardware before decorating anything. Paint can hide scratches, but it cannot fix a table that folds itself during Scrabble.
If the tabletop is severely warped, soft, or crumbling, you may need to replace it with a thin plywood panel cut to size. For most tables, however, the original top can be reused. Even a torn vinyl surface can become a strong base once it is cleaned, smoothed, padded, and recovered.
Step 2: Remove the Tabletop from the Frame
Turn the table upside down on a soft surface and remove the screws connecting the tabletop to the metal frame. Keep the screws in a cup, bowl, or labeled bag. Do not trust yourself to “remember where they went.” That confidence is how screws end up in the junk drawer for the next seven years.
Removing the top makes painting and recovering much easier. It also helps you avoid overspray on your new fabric or glue on your freshly painted legs. Work in sections and take a photo before disassembly if the frame has unusual brackets or folding hardware.
Step 3: Clean Everything Thoroughly
Cleaning is not the glamorous part of a folding card table makeover, but it is the part that decides whether your finish lasts. Dust, grease, old adhesive, hand oils, and mystery garage residue can prevent paint and glue from bonding properly.
Wipe the tabletop and frame with a damp cloth and mild cleaner. For metal legs, remove dirt from joints and folding mechanisms. Let every part dry fully before sanding or painting. If there is rust, gently sand it away and wipe off the dust. If the old vinyl is sticky or peeling badly, trim away loose pieces so they do not create bumps under the new cover.
Step 4: Sand or Scuff the Surface
Sanding gives primer and paint something to grip. You do not need to grind the table into sawdust; a light scuff is usually enough for painted metal legs or a glossy frame. Use medium-grit sandpaper for rough areas and fine-grit sandpaper for smoothing. After sanding, wipe away dust with a tack cloth or damp rag and let the surface dry.
If the frame is metal, be careful around hinges and moving parts. You want to rough up the finish, not pack dust into the folding mechanism. If the table has a wood or composite top that will be painted instead of recovered, sand evenly and fill dents before priming.
Step 5: Prime the Base
Primer is the quiet hero of furniture painting. It helps paint stick, evens out color, and improves durability. Use a primer that matches your material: metal primer for steel legs, bonding primer for slick surfaces, and wood primer for raw or porous wood. Apply thin, even coats and allow proper drying time according to the product label.
For spray primer, use light passes instead of one heavy coat. Heavy spray paint tends to drip, and drips are basically furniture tears. Hold the can at a consistent distance, keep it moving, and work in a well-ventilated area.
Step 6: Paint the Legs and Frame
Paint changes the whole personality of a card table. Black makes it modern. White makes it bright. Gold or brass tones add a little glam. A bold color like coral, teal, or yellow turns the table into a cheerful statement piece. For a more timeless look, choose soft green, navy, charcoal, cream, or warm gray.
Apply two or more light coats rather than one thick coat. Let each coat dry before adding the next. If the table will be folded and unfolded often, consider adding a clear protective topcoat once the paint is fully dry. This helps reduce scratches, especially on metal legs that rub against each other during storage.
How to Recover the Card Table Top
The tabletop is the star of this project. Recovering it is where the transformation goes from “nice little paint job” to “I rescued this from the land of sad furniture.”
Choose Your Covering Material
Different materials create different results. Vinyl tablecloths are budget-friendly and wipeable. Oilcloth is durable and cheerful. Faux leather looks polished and is easy to clean. Upholstery fabric feels more custom but may need a clear vinyl layer if spills are likely. Felt works well for games, but it collects lint and is not ideal for craft glue or snacks.
When in doubt, choose a medium-weight fabric with a tight weave. Very thin fabric may show bumps underneath. Very thick fabric can be hard to fold neatly around corners. Patterns can help disguise small imperfections, while solids create a cleaner look but reveal every wrinkle. Choose wisely; fabric has no mercy.
Add Padding If Needed
If the old top feels thin, dented, or uneven, add a layer of batting or thin foam before the decorative fabric. Cut the padding slightly larger than the tabletop, smooth it in place, and secure it underneath. Do not add too much padding if the table must fold flat or if you want a firm writing surface.
For card games and puzzles, a very light cushion can feel luxurious. For crafts or dining, a firmer top is usually better. A table that is too squishy may make cups unstable, and nobody wants iced tea slowly leaning into disaster.
Cut the Fabric or Vinyl
Lay the fabric face down on a clean floor or large work surface. Place the tabletop upside down on top of it. Cut around the table, leaving several inches of extra material on all sides. This extra fabric gives you enough room to pull, stretch, fold, and secure the material underneath.
If using patterned fabric, center the design before cutting. A crooked stripe or off-center floral print will bother you forever. Maybe not loudly, but quietly. Every time you play cards, it will whisper, “You rushed me.”
Secure the Edges
Starting at the center of one side, pull the fabric snug and staple or glue it to the underside of the tabletop. Move to the opposite side and repeat, pulling evenly. Then do the same with the remaining two sides. Working from the center outward helps prevent wrinkles and keeps tension balanced.
If the tabletop is thin, short staples are essential so they do not poke through the top. If staples are too risky, use hot glue or a strong adhesive appropriate for the materials. Work slowly, checking the top often to make sure it stays smooth.
Fold the Corners Neatly
Corners are where makeovers reveal the truth. Take your time. Fold the material the way you would wrap a present, trimming bulk if needed. Pull the corner tight, secure it underneath, then check the top. The goal is smooth and tidy, not a fabric dumpling hiding under the edge.
For thick vinyl or faux leather, small relief cuts may help the material fold cleanly. Do not cut too close to the tabletop edge. Leave enough material to hold securely underneath.
Design Ideas for a Beautiful Card Table Makeover
Modern Game Table
Paint the legs matte black and recover the top with dark green felt, navy faux suede, or charcoal fabric. Add a clear protective layer if food and drinks will be involved. This look feels grown-up, cozy, and ready for poker night, bridge club, or extremely competitive Uno.
Vintage Cottage Table
Use floral oilcloth, cream-painted legs, and softly rounded corners. This style works well in breakfast nooks, craft rooms, guest rooms, or covered porches. It feels charming without trying too hard, like a table that knows how to bake biscuits.
Kids’ Activity Table
Choose a bright wipeable vinyl top and colorful painted legs. Patterns with stars, dots, animals, or rainbows can make the table feel playful. Add small baskets nearby for crayons, blocks, and stickers so the table becomes a complete activity station.
Minimalist Folding Table
For a clean, modern update, use a solid neutral top and a sleek black or white frame. This design is great for apartments because the table can serve as a temporary desk, dining surface, or project table without clashing with the room.
Craft Room Workhorse
Recover the top with clear vinyl over a patterned fabric. The fabric gives personality, while the vinyl protects against glue, paint, glitter, and whatever “quick project” somehow becomes a four-hour crafting incident.
Common Mistakes to Avoid
Skipping the Cleaning Step
Paint and adhesive need clean surfaces. If you skip cleaning, the makeover may look good for a week and then start peeling like a sunburned tourist. Clean first, decorate second.
Using the Wrong Paint
Regular wall paint is not always durable enough for folding furniture. Choose spray paint, enamel, or furniture paint made for the surface you are covering. Metal, laminate, wood, and plastic-like surfaces all have different needs.
Pulling Fabric Unevenly
Uneven tension causes wrinkles, waves, and crooked patterns. Secure one side, then the opposite side, and keep checking the top as you work. A smooth surface depends on patience.
Forgetting How the Table Folds
Before adding thick fabric, foam, trim, or decorative details, make sure the table can still fold. A card table that no longer folds is just a small square table having an identity crisis.
Reassembling Too Soon
Paint may feel dry before it is fully cured. Handle freshly painted parts gently and give them time before heavy use. If you stack or fold the table too early, painted surfaces may stick together or scratch.
Budget-Friendly Tips for a DIY Card Table Makeover
You do not need expensive materials to get a polished result. Check thrift stores for old card tables, fabric remnants, vinyl tablecloths, or curtain panels that can be repurposed. A small table does not require much fabric, so remnants are often enough.
Use leftover spray paint from another project if it suits your design. Repurpose a damaged tablecloth by cutting around the good section. Add clear vinyl over a fabric you already own. Even an old shower curtain can become a wipeable top if the material is sturdy and clean.
The real upgrade comes from careful execution, not expensive supplies. Smooth fabric, clean corners, even paint, and sturdy hardware will make a low-cost project look intentional. In DIY, neatness is basically the luxury version of effort.
Maintenance: How to Keep the Table Looking Good
Once your card table makeover is complete, treat it with a little kindness. Wipe spills quickly, especially if the top is fabric rather than vinyl. Avoid placing hot pans directly on the surface. Use coasters for drinks and a cutting mat for crafts. Fold the table carefully so painted legs do not scrape against rough surfaces.
If the top is vinyl or oilcloth, clean it with a soft cloth and mild soap. Avoid harsh cleaners that may dull the finish. If the painted frame gets scratched, touch it up with a small brush or spray paint applied to a disposable surface first. Tiny repairs keep the table looking fresh for years.
Experience Notes: What You Learn From a Card Table Makeover
A card table makeover teaches you that small projects can still have big personalities. The first time you flip an old folding table upside down, you may think, “This will take an hour.” That is adorable. DIY time operates in its own dimension. One hour becomes three, mostly because you spend twenty minutes finding the right screwdriver and another fifteen deciding whether the fabric pattern should face north, south, or emotionally toward the snack table.
One practical lesson is that preparation always shows. When the metal legs are cleaned, lightly sanded, and primed, the paint looks smoother and lasts longer. When you rush and spray paint over dust, the finish develops bumps that look like the table has goosebumps. The difference is not talent; it is patience. Most successful makeovers are less about being naturally crafty and more about doing the boring steps anyway.
Another lesson is that fabric choice matters more than people expect. A beautiful cotton print may look perfect in the store, but if the table is used for snacks, crafts, or kids, it needs protection. Clear vinyl over fabric is a smart compromise because it keeps the pretty pattern visible while making the surface wipeable. For game nights, a softer top can make cards easier to handle, but it should still be tight and smooth. Wrinkles under a puzzle are tiny mountains of frustration.
You also learn that corners deserve respect. The flat sides are easy. Corners are where confidence goes to be tested. The best approach is to fold slowly, trim extra bulk, and keep checking the top. A neat underside may not be visible during use, but it affects how the edge looks. Plus, there is a special kind of satisfaction in knowing the bottom of your table is tidy, even if nobody else ever sees it. That is private DIY pride, and it counts.
Painting the frame brings its own little adventure. Spray paint is fast, but it rewards light coats and punishes impatience. If you spray too close, you get drips. If you spray too far away, you get a dusty texture. If you paint outside on a windy day, your cardboard drop cloth may attempt to leave town. The sweet spot is calm weather, steady movement, and several thin coats. This is not dramatic, but it works, which is better than dramatic and sticky.
The biggest experience-based takeaway is that a card table can become more than spare furniture. After a makeover, it often becomes the table people actually want to use. It can turn into a puzzle station by the window, a kids’ art table in the corner, a holiday dessert table, a sewing helper, or a dedicated board-game surface. The makeover gives the table a role, and that role makes it feel like part of the home instead of something dragged out only when guests exceed the chair supply.
A successful card table makeover does not need perfection. It needs function, durability, and a design that makes you smile when you unfold it. If one corner is slightly less perfect than the others, congratulations: you have made something by hand. That little imperfection is proof that you rescued an old table instead of buying another disposable one. And honestly, that is a pretty good deal for a few supplies, an afternoon of effort, and maybe one minor argument with a staple gun.
Final Thoughts on Your Card Table Makeover
A card table makeover is one of the easiest ways to practice DIY furniture upcycling while creating something genuinely useful. With a clean frame, fresh paint, durable fabric, and a smooth recovered top, an old folding table can become a stylish game table, craft station, kids’ activity surface, or extra dining spot.
The secret is not complicated: clean well, prep the surface, use the right paint, pull the covering evenly, and give everything enough time to dry. Choose materials based on how the table will actually be used, not just how beautiful they look online. A gorgeous fabric is wonderful, but a gorgeous fabric protected from spaghetti sauce is even better.
Instead of hiding that old card table in the closet, give it a second life. It already folds, stores, and shows up when needed. With a thoughtful makeover, it can finally look as helpful as it has always been.
Note: This article was created from practical DIY furniture refinishing, painting, and reupholstering knowledge synthesized from real home improvement and craft guidance, rewritten as original web-ready content.